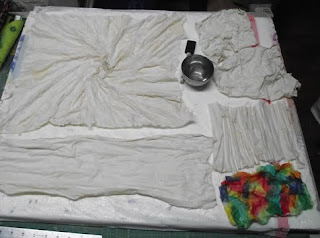
I have been working on the July project from the blog andthenwesetitonfire.blogspot.com it is a process of layers of muslin, tissue and cheesecloth. First muslin was dipped in a 50/50 mixture of white glue and water, wrung out, scrunched up, and left to dry. My largest piece, I pulled up from the center, and swirled it around in a tight twist, another I folded length wise and twisted into a tight rope. Two small scraps, I just wadded up into a ball.
After I left it outside to dry all night, I un-scrunched it, and laid it out to dry some more. I was concerned that I had not used enough glue, as it wasn't very stiff. The next step is to put on layers of tissue paper with more diluted glue. I thought "easy," I'll just dip the tissue in the glue. Big mistake!! It turned into mush. Ok, try again, use a foam brush to layer on the glue, tissue and more glue. This took a while to make sure all the areas were covered, and it got wet enough that I worried it would flatten out. Again, it took all night to dry, but was much crisper, and held it's shape well. The tissue gave it more wrinkled texture too.
On one of the small scraps of muslin, I decided to try colored bleeding tissue, instead of plain white. I ripped off small bits of various colors, and glued them down, overlapping slightly. It gave a very clear stained glass effect, I wish I had color coordinated the tissue, instead of using a rainbow. A second small scrap, I had accordion pleated and decided to paint with acrylic paints. I used various browns, tans, yellow and then highlighted it with metallic copper. I was trying for a tree bark like texture. I don't know what I am going to do with the stained glass piece, just a sample, but the bark, I'm going to work on with thread wrapped pipe cleaners and fabric beads.
Now for the main piece of fabric, the next step was to add strips of white cheesecloth to the layers with more glue. Of coarse I had to go buy more cheesecloth, 'cause all of mine was dyed. It was quiet expensive for a package, in the canning supplies section, I'll have to check for yardage at Joann's Fabrics next time. It took at least an hour to cover the muslin with strips of cheesecloth, it stuck to my fingers, didn't stick to the muslin, lots of glue, draping it over the ridges and dips of the scrunched fabric. It added a LOT of TEXTURE!! Wow! It was worth all the effort. More drying time, I'm glad I wasn't in a hurry to check out this process, it was quiet a few steps to follow. This was as far as the directions went on the blog... what next? I had already tried several "what ifs?" with the colored tissue and the paint. I checked the blog, waited, no new posts, it had been over two weeks, some of the other participants should have tried it by now, and added their thoughts. By now I had an idea of what I wanted to do with it, it had a nice swirl to the fabric, around a peak in the center. It is going to be named, "Seaweed Vortex" and the next step is paint. I thought about using Tsukineco Inks, but choose to stay with the acrylics, I used a foam brush with dark green, olive, dark teal, med teal, turquoise, light blue and light teal radiating from the center, getting lighter towards the edges. It was tough getting paint in all the crevasses, I watered it down so it would run, and even had to go back with a fine brush and do touch up. I also highlighted it with metallic silver paint.
Now for the final touches, I plan on adding my hand dyed cheesecloth, fanning out from the center in bright colors, like coral and seaweed. Also adding real sea shells, maybe glued, maybe stitched, and beads, and fish buttons & charms. Glitter? A mermaid? Angelina? This is the fun part. I can't wait to see where my imagination takes me. It is a very textural piece of textile, definitely NOT a quilt! So it is very different from what I usually do, stepping out of my comfort zone. No stitching and quilting at all, which is what I really do best. This is textile arts at its most basic definition. New viewers, check out August giveaway on the newest post.


Love your experiments with the techniques from our Fire blog. I'm one of the resident artists that "should have tried it by now," but I haven't been home this month enough to "play." I DO have the first step done, but I left my pieces much flatter than yours. Now that I've seen yours, I may rethink that decision. I'm still hoping to get a few steps further in the process before the end of the month. Wish me luck!
ReplyDeletethank you, I look forward to seeing what you are doing.
ReplyDeleteI'm one of the artists that took forever to post about this month's technique -- like Beth, I left mine much flatter than yours. I love the colored tissue paper that you used. I bought a bunch a long time ago to use for something like this -- I guess I'm going to have to dig it out now. Thank you for sharing your work!
ReplyDelete