Nine fantastic artists from Fyber Cafe, went to Vera's ranch for our annual dyeing workshop. Vera presented a structured class, working with different water soluble dye resists. She used us as Guinna pigs for a class she is teaching for Oregon SAQA. We used potato dextrin, corn dextrin, flour paste, sugar paste, soy wax, commercial water soluble resist, school glue, masking tape, and wet newspaper resist. We applied the resists with many different tools and techniques. The top pic is a flowery potato masher and masking tape. The next is a squiggly soda straw from the dollar store. We each made 8 or more fat quarters, on already pastel dyed PFD fabric. They were laid out to batch after the first coat of dye was added. The gold one has a checker board stencil, and a plumbing connection used as a stamp. 
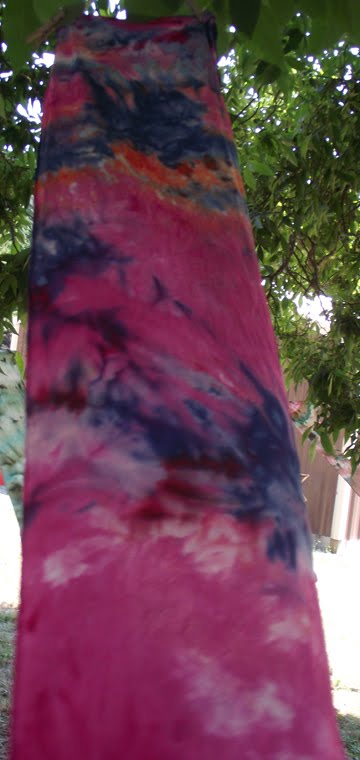
Pink and purple were added to the resist treated fabric. After everything was coated with the resists, we had a lunch break, wonderful broccoli salad, peach cobbler, fresh salsa and chips, spice cake, quiche, melons, sandwiches and other vegie salads. Feeling like we needed naps, we got back to the workshop and started to coat everything with dyes. We used Procion MX Dye concentrates, with a thickening paste and painted each piece, many with multiple colors. They were left over night to batch the dyes and the next day we added layers of more resists, and more dye. I used mostly the potato dextrin the 2nd day, because it gave a nice crackle effect and the soy wax because it dried immediately, so I could add another layer, with out having to batch the dyes. All the fabric was wrapped in plastic to take home and batch, then rinsed and put in the washing machine with Synthrapol, then dried. We had so much fun, we scheduled another day next week to finish adding layers and make a few more pieces. So here are the finished pieces, they dried lighter than they looked when wet, all but two had multiple layers, the sugar was too sticky too work with even when dried, and the dextrins had to be ordered from Dharma Trading Co. click here
It was all so much fun, I hardly wanted to take time out for lunch. It is really wonderful to work with creative people, we each inspired the others to try new things. When we were cleaning up and packing things in the cars, I spotted a rattle snake, heading under the cars, we chased it away and ended up trapping it in a hole. So we got an extra kick of excitement to the workshop.
I am linking this to Nina-Marie's "Off the Wall Friday" click on the badge in the right hand column to see what other wonderful artists are up to this week.
Art quilting, tips, techniques, thoughts and creativity. Textiles, antique quilts, fabric dyeing, fibers.
Showing posts with label Dye workshop. Show all posts
Friday, August 15, 2014
Sunday, August 5, 2012
Dye Workshop
What a wonderful weekend, dying fabric and trying to marble fabric. 10 of our artists from "Fyber Cafe" got together and had a dye workshop, this is our 5th annual event. The ice dyeing on the silk scarves worked out beautifully, we all made several scarves and some even dyed yardage. See more details on Fybercafe.blogspot.com It was a hot weekend, 93 on Friday, 104 on Saturday, yikes! We were outside most of Friday, and thankfully her studio had air conditioning. For details of the ice dyeing see previous post here also.
In the afternoon, we did prep work for marbling on Saturday, soaked the fabric in alum, and hung it up to dry. Prepared the goop that is used to float the paint and make the patterns on. Unfortunately we had trouble making the paints the right consistency, for the marbling, and got rather frustrated. A few of us are going to try again on Wednesday at my house.
We did have a great time, opening our scarves after we left them to sit over night. We hung them on a tree and they flapped in the wind and glowed in the sun. The potluck was tasty as always, lots of goodies, including apple crisp and chocolate zucchini bread.
Thursday, August 2, 2012
Ice Dye Results
The ice dyeing from yesterday, turned out very interesting. The blue/turquoise/black did not hold it's color very well in the washing. I don't know if this is because the dye was old, or it just looked so much darker wet, so that I did not use enough powder. The red/raspberry/orange came out very vibrant and colorful, with the blue added the purple was very bright. The only problem I had was with the golden yellow, it caked and clumped up and did not want to dissolve. I mixed it around a bit with a rock and it did bleed in and dyed very intense, but did not spread very far. So judge for yourself the colors and patterns. The pictures of the fabric are pretty good representations.
Some were fat quarters, some were half yards, I went to the larger pieces cause it was hard to pile the ice on the smaller ones. But it did not make any difference, once it was folded and scrunched up, they were both small piles of fabric. I've seen in the magazines and blogs, that some people put the ice in a large jar or bucket, this ends up all melting together and sitting in the dye, like a "parfait dye" process. I think on the wire shelves, it made the dye and ice seep through the fabric, and the muslin wasn't sitting in a puddle. I have two wire baskets, I'm going to try also.
The results look very similar to tie dyeing also. I folded into triangles a few pieces, accordion folded some and scrunched up others. I like the patterning, and will try mixing more colors next time. Using the dry dye powder was simpler than having to mix up all the jars of solution, but I think it used a lot of powder. I dyed 4 yards of fabric, but I think the dye would have done more fabric if made into concentrates, and immersion dyed. I feel it was a good use of old dyes, but if I just spent a lot of money on dye, it might be a waste. I hope you enjoy following the process with me. I get to do it all over again tomorrow at our two day dye workshop, but we are doing silk scarves. I think the colors will come out scrumptious!
Sunday, August 28, 2011
Fabric Dyeing Workshop 2011 part II
Dyed cotton yarn, "Sugar and Spice" made into 3 and 5 yard skeins, soaked in soda ash, and drizzled with dye concentrate. Also a large ball of cotton yarn, with the dye just poured on. I should have squeezed it some, to get the dye to penetrate into the ball.
My dye prints and painting drying on the line and on the bushes.
A large queen size sheet from Marnie, that we hung on the fence and splashed leftover dye onto it. We smeared it dripped it, sprayed and made hand prints, we sprayed it with water to make the dyes bleed too.
Some of the dyed fabric I made in a 3 layer "parfait" technique, the sets of 3, on the left, top and bottom, were all in separate dye pots together as a 3 layer batch. Peggy and I got to have a second visit with Vera, she called and said she had a lot of dye concentrate left and would we like to come down. Several of our pieces needed to be redone or layered with additional dye printing, the colors had washed out, probably cause I did not pretreat with soda ash. Also they just needed "More" color, texture, etc.. they just looked unfinished. So we spent the day adding extra layers of color to pieces we had already worked on, the difference was astounding, a lot of depth and texture created a more unified piece, more interesting to look at, with good color contrast, sometimes we just added highlights or contrasting color to give it "Pop." I could really see the difference that adding more layers made in the pieces, it was worth the extra work! I think I really like the pieces that are more textural, the ones with large prints are difficult for me to work with. I don't know what to use them in or how to cut them up. They are fun to make, but now what to do? An all over pattern or texture is easier for me to envision in something, large abstracts are not my thing.
Saturday, August 13, 2011
Fabric Dyeing Workshop 2011 part I
Our group "Fyber Cafe" spent two days dyeing fabric at Vera's, Fun! FUN! FUN! 8 of us gathered, set up tables, mixed dye concentrate and soda ash water. We "did our own thing" mostly dye painting with thickened dyes. Vera had taken a class with national teacher Ann Johnston in Lake Oswego, Oregon, at her home studio. It was a 5 day class, in painting, printing, resists, transparency of dyes, and color interaction. She tried to help us understand some of the principles, but I think we just had to play with the dyes ourselves. Her process involved drying between paint layers and adding additional layers of color, we were too impatient for that. We had to/wanted to, paint several colors, wet on wet, her process was rather controlled and slower on dry fabric. Several of us did manage to create layers of color and texture, we used foam stamps, and different plastic mesh, stencils, and kitchen tools to print patterns.
Monday, August 16, 2010
Dyeing Workshop 2010
Our annual fabric dyeing workshop at Vera's was this weekend. We had loads of fun, even tho it got to 100' on Saturday, arrgh!! I was working on batik pieces that I had already waxed at home, and it was so hot, my cheap foam brush with the dye was rubbing the wax right off the fabric, what a mess. I put it aside at lunch time, and let it dry out back in the shade. During the afternoon I went down to her pottery studio- dye workshop, which had struggling air conditioning, and dye a quantity of fabric. I used a 3 layer technique, I start with one piece of fabric in a small tub, add dye, then fixative, then another piece of fabric, a second dye and fix, then a third layer. It helps if you don't stir the fabric, it blends and bleeds in some areas and not others, making a blotchy blend of colors on each piece. It is also fun to use very different colors, like eggplant(dark purple) +turquoise+ yellow gold. If you know your color theory you can kinda predict what it will make, but it is usually a surprise, cause you don't know how much it will blend or stay separate. These were my favorite types of dyeing to do. On Sunday we had it cooler, so I got to finish working on the batiks. I did about 10 pieces, they each got 3 colors layered on, with wax added at each step. The darker colors added last, really highlighted the lighter colors that I had waxed over. When I got home I ironed with lots of newspaper to remove some of the wax. It is a real pain to do, I still have more pieces to do later. The soy wax we used is water soluble with hot water and soap, but our plumbing is so old, I didn't want it coagulating in the pipes as the water cooled. I will finish it in the washing machine when I am done ironing as much wax out as I can.
Thursday, August 20, 2009
Batik Photo of Amy
Saturday, August 15, 2009
Fabric Dyeing, Conclusions and Results
I took my fabric home with me and rinsed out the pieces had done with low immersion dyes, they are the sets of 3 in the photos, that have no printing on them. On the waxed batiks, I remooved as much wax as I could with lots of newspaper and a medium iron. I swapped newspaper frequently, and went through alot of it. Put down slick, glossy pages on the bottom to protect your ironing board pad. After removing alot of wax, the fabric was still stiff and bits of excess dry dye was splotched on it. I washed the fabric using my washing machine, HOT water and a capfull of Synthrapol detergent. Immediately after washing I put them in the dyer and wiped off the wax ring in the washing machine. It was still warm and soft and wiped off easily with a paper towel. The fabric came out beautifully with no stiffness that traditional bee's wax batik has. The soy wax was much easier to remove, being water soluble. The bee's wax needs to be boiled to remove the residue of wax, a much more complicated process.
So the soy wax has several advantages.
1. It melts at a lower temperature.
2. It is white, not yellow brown so you can see truer colors on previous layers.
3. It is water soluble so wax removal and cleanup is easier.
I got bee's wax locally from a bee/honey guy for $3.50 a pound
The soy wax was $4 a pound from Dharma with shipping for 5 pounds it came to $6.00 a pound, and I shared the extra wax with my friends in Fyber Cafe.
Now I need to find something fun to do with my finished fabric!
I hope you have enjoyed my first atempts at blogging. AMY
Thursday, August 13, 2009
Subscribe to:
Posts (Atom)


