Showing posts with label Embellishments. Show all posts

Wednesday, May 11, 2011

"Gimme Three Steps"


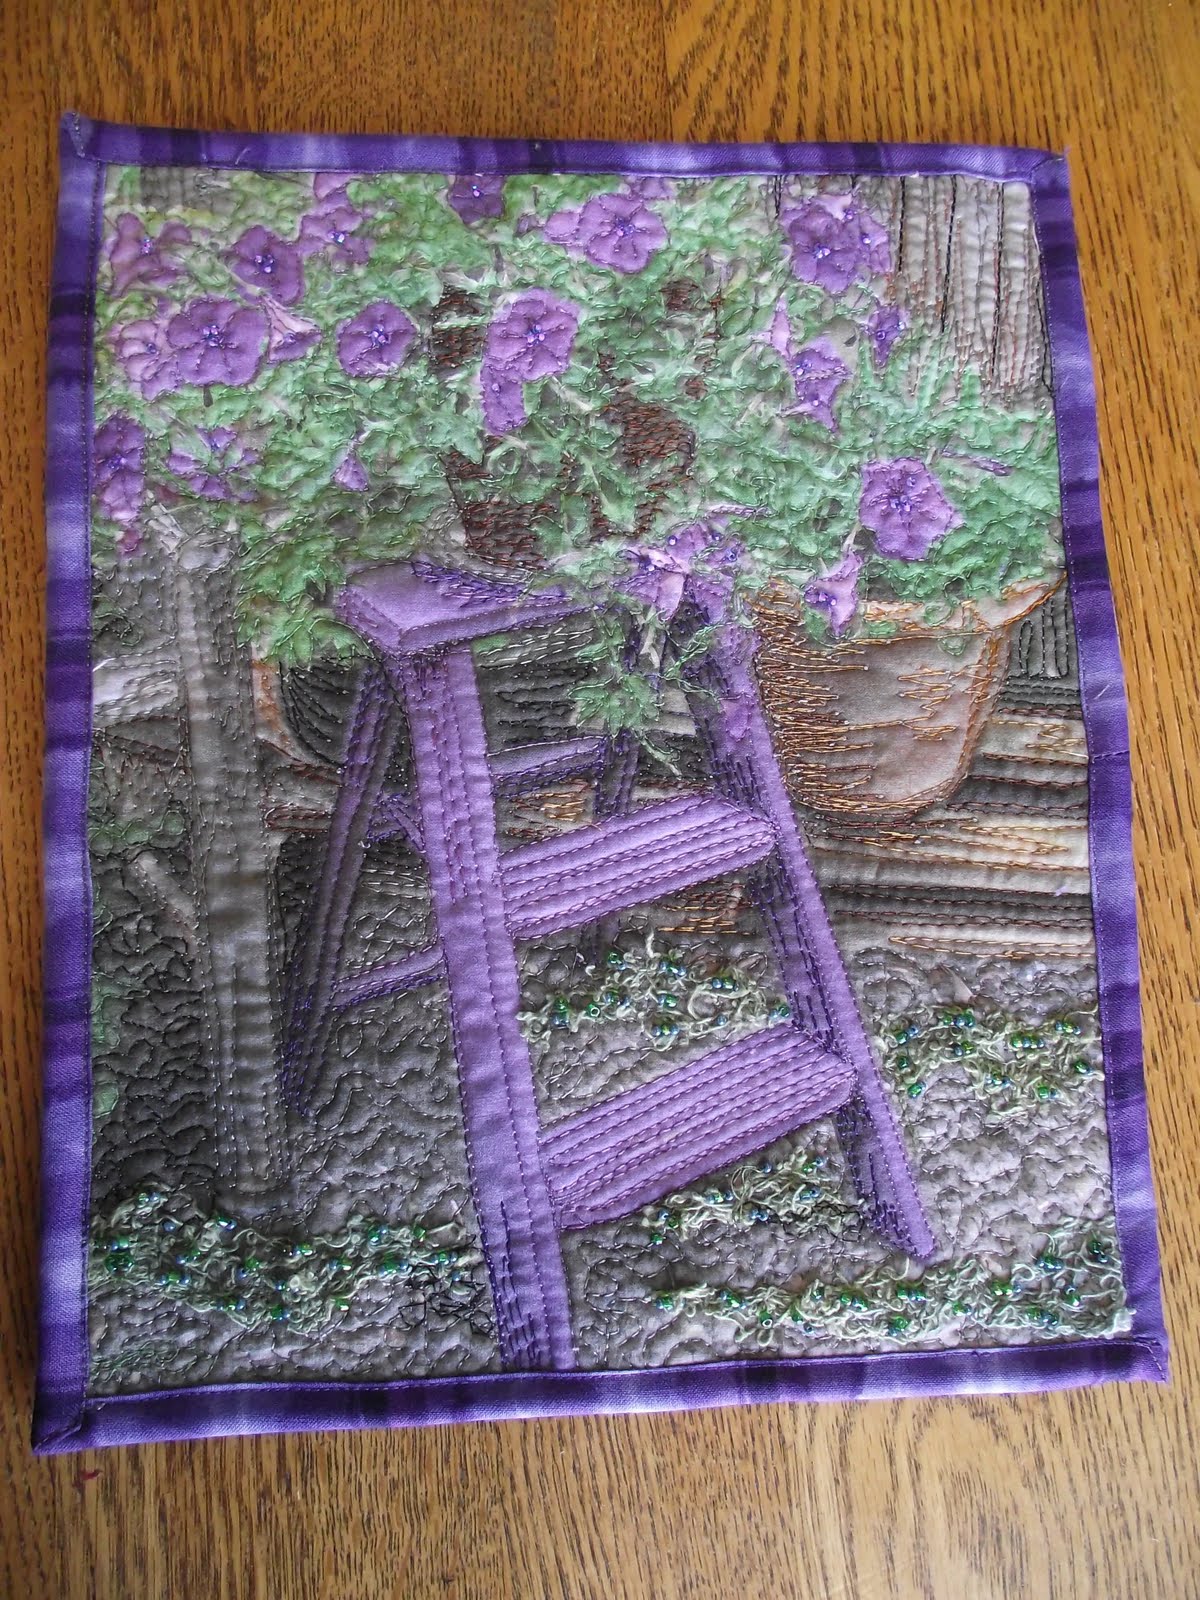
I finished a small photo quilt for my Mom for her birthday/Mother's day, it is an 8" x 10" photo that I printed on fabric on my computer printer. It is a photo I took at her place of a small wooden step stool, that she had painted purple, and then was so happy that the petunias she planted near, were the exact same color. I thread painted it with free motion quilting, in matching rayon threads, to outline and color in the photo. I added hand dyed greenish cheesecloth to the bottom area, which was boring gravel, and added small green seed beads for texture and sparkle. Each of the flowers also has a purple bead in the center, and it has a purple binding. The name comes from a song by Lynyrd Skynyrd, "Gimme Three Steps"

Monday, May 2, 2011

Version II, To Nurture & Protect

close up of felted mountains and sky

close up of felting

finished felting yarns onto muslin

Wool and yarn selections

Felted wool sweaters

I've started a new quilt for the Fyber Cafe challenge. It is similar to the previous one, 18" diameter circle of layered bands of color, sky, mountains, greenery, soil/rust, water and polar white. It is all done with needle felting on a muslin background. I cut strips of felted wool, most I had bought at a garage sale, a lady had felted a BUNCH of sweaters! But some I used commercial felt from my crafty days. I added strips of wool tufts, yarns, dyed cheesecloth, NO Angelina. I had gotten a NEW needle felting machine at Fabric Depot, last time I drove to Seattle, it was my first time using it, WOW, it felted beautifully, all the different textures, of yarn and felt. I also had a little bit of shimmery silky white fabric, I tore into strips for the polar areas. I broke at least 5 needles, moving too fast, I am sure glad I thought to get extra needles. I am now adding beads in swoosh bands across each color layer. Each is a mix of different size seed beads, bugles, and larger beads. It adds a lot of sparkle to a natural fiber textural background.

Wednesday, December 29, 2010

"To Nurture and Protect" Project

FIMO penguins I made to add to the bottom.
Almost done, need to add penguins and some other edge detail
Right side landscape, owl in tree and desert area
Middle landscape, forest and woodland
left side landscape, tropical


The Fyber Cafe challenge is almost done, we all got delayed, Thanksgiving & Christmas and personal issues. Hopefully in January the finished projects are due. We will still have to mount them on the stretcher bars covered with fabric. A few of the projects are coming along nicely, and others have good intentions, so we will see. I got the last details worked out on mine and today I finally got the backing onto it. I turned it "Pillowcase" style with an extra flap at the top to insert a piece of cardboard to support the circular design. I won't use the cardboard when stitched to the frame, but afterwards, I don't think I'll leave it on the frame. I top stitched all the way around the circle to give it a more finished edge. I have a few more bits and pieces to add along the edges, and some small areas that need to be covered, 'cause they came up short. The undersea area came out beautifully, I added silk ribbon embroidery, lots of beading, and regular floss embroidery, real seashells, it is busy with coral and embellishments. In the south pole area I added melted bits of turquoise chiffon, and streams of beads with white, pearl, clear turquoise, crystal and white snowflake buttons. The mixed group of beads flows across the bottom in waves. I found one pair of penguins earrings at Walmart but I had to repaint them, they were blue and sparkly. I made 3 extra penguins with FIMO clay, in black, white and yellow, I baked them too hot and the white got burnt looking so I had to repaint them too. I forgot to put button holes in them, so I'll just stitch them on around the necks. I can see the end of this challenging project. I put in a lot of detail, including a fortune in hand sewn beads and buttons. The non-traditional fabrics, velvet with cotton balls, silky polyester, glittery 1/4" netting, melted chiffon and wool needle felting, added to the whole concept. It is an exuberant expression of the environment and all the various creatures in it.
Sunday, November 8, 2009

CD Bag


A few more pictures of my CD bag, The quilting is really highlighted by the paint.

Sunday, August 30, 2009

Fabric book, continued

I have worked on the pages of the book, two at a time, in facing pairs, and tried to develope a theme in each set of pages. Sometimes it was just a color theme, supported by vintage buttons and flower and fabric choices. Other times it was an element of the decor, birds and birdhouses, rabbits and violets, copper bells, the Tonka trucks were fun to work with, I added wheels and construction elements, pink flamingos was fun too, I added vintage pink rhinestone buttons, palm trees, and other flamingos. On several of the garden scenes I carried the picket fencing up to the page design. I added lots of tree branches with various leaves and silk flowers. All the silk flowers are beaded, as well as all the fabric butterflies and dragonflies. Beads and embroidery accents help blend the buttons to the page, so they don't stick out so much, a cluster of beads helped the buttons, so they didn't look so out of place, just stuck there for no reason. I used a little bit of paint , gold around the edge of the sun, some stamped leaves, and I made a wire rug beater to sew onto a page and used it to stamp the design onto the page also. I notice there is a lack of ribbon and lace, it just didn't come into usefullness with the garden scenes. I did embroider a few words onto the pages. I also used some metal tags with words on them. I was limited to useful words that I could find in the collection at the store, if I could have printed my own, it would have been unlimited. But it was a challenge to make a cohearent phrase out of the choices I had. Although going through the tags was lots of fun! I also found some metal letter beads that I had gotten at a garage sale, I spelled out Joey's dog "Summer" on the back page above her photo. Of coarse I didn't have enough letters to do Aurora too, so I went and got some plastic letter beads. You always run out of the useful letters, the vowels and s, t & r. And then you have to go buy another pack of beads. So you end up with a whole bag of q, z, x and j. I finally finished all of the embellishments, what fun it was palying with all the "STUFF" My table was piled high with fabric, bead trays, button boxes, embroidery thread, boxes of silk flowers, and tons of other stuff. It was great to use some of the stuff I had been hoarding. Now onto assembling the project into an acordian style book.

Sunday, August 23, 2009

Sepia Garden Book, part II

I have been embellishing my photo pages, with everything from beads and buttons to charms, feathers, metal washers and a penny, paint, silk flowers, cardboard cutouts, embroidery, even a rubber pig!! It has been an adventure just collecting things, Joann's fabric was having and end of season button clearence, 80% off, Michaels Crafts was having a sale too, I went to a local auction and a lady bought a box of junk jewelery and we shared it, I got all sorts of weird stuff, chains and charms, a kitten button and I gave her $1 When I have been stumped on what to add, I have gone to my vintage button collection from my mom. A friend Suzie from quilt guild came over and we went through Mom's button jar, Suzie is a serious button collector, she just went to a West coast button convention, she found a small stash of interesting buttons from Mom, and I got all the fun ones she didn't want, but she lectured me on all the different types and what era they are from. I came home with a big zip lock bag of them. Mom's jar is not just any quart jar of buttons, it is a five gallon glass pig jar, full of buttons, that she picked up at fleamarkets and such in the 70's. we had lots of fun going through them, we poured them out onto cookie sheets and picked through them for hours. Suzie didn't believe me when I said five gallons!! I'll get some photos of the pages next time I am online.

Sepia Garden Book, part I

I started on a new project with photographs I took at my sister Vicky's, up in the Seattle area. She has a beautiful garden with lots of funky stuff, it was stuck here and there in her flowers. I started taking pictures on the "Sepia" setting on my new Canon digital camera. I loved the results and took alot more. With a digital camera, the view finder shows you a sepia view, not color, so I was able to really see how much contrast there was, how much shadow and light. I had never been interested in taking Black & White photographs before, because I couldn't see what the outcome would be. But with the digital cameras, it gives you the actual picture in the view finder. I had always admired the B & W pics my sister had taken of her kids and my friend Sue L. in California had taken alot of B&W too. Taking B&W pics of your partially finished quilts, will give you an idea of wether or not you have enough contrast in your fabric choices, and your quilt pattern. I think it will be a usefull tool, instead of looking at "watercolor style" quilts with a ruby red viewfinder, you can use a digital camera. I took almost 50 pics when I was there, all sorts of stuff, pink flamingos, wicker chairs, old granite ware pots with succulents, wrought iron garden art, sculptures, birdhouses, lots of nic-nacks, no flowers though, all just "Stuff". I did take flower pictures in color though, mostly lilies and dahlias and marigolds at this time of year. We did pick lots of blueberries, tho I missed out on the blueberry pancakes. ;-( When I got home I wanted to make a quilt with some of the pictures, so I started printing some of them out on my fabric, that was treated with "bubble Jet set,' and backed with freezer paper. I put it through my computer printer and printed two to a page. After removing the freezer paper I heat set the fabric/ink with an iron, if making a quilt or pic on a T-shirt you want to rinse out the excess ink first, then iron. As I was working on them I decided to make a fabric book instead. So I started sewing the individual pictures onto a cotton backing with strips of fabric around them "log Cabin" style. These individual pictures will then be embellished and put together as an acordian style book.