Art quilting, tips, techniques, thoughts and creativity. Textiles, antique quilts, fabric dyeing, fibers.
Sunday, November 24, 2013
Umbrella Girl
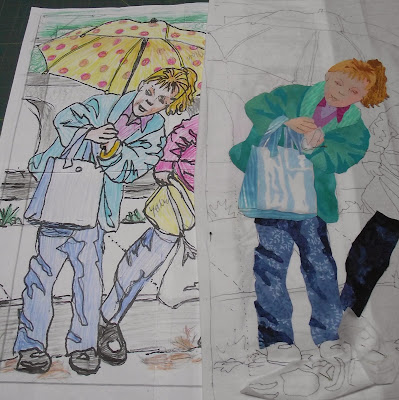
The Umbrella Girl is taking shape, the denim jeans were the easiest part, I had the perfect fabric. Finding the teal was difficult, as the teals kept going bluer or greener, I did not want something too bright to fight with the umbrella, and I thought it was also in the shade of the umbrella. The face fabric was from a packet of hand dyed flesh tones that I picked up at a quilt show. It still does not give me the range of color I want for shadows, in this small a format. It is either too pink, or too grayed beige. Maybe I'll have to try to dye my own at the next dye workshop. I went more red with the hair, so it would contrast with the yellow umbrella. Too yellow a blonde would not have stood out. I ended up fusing the pieces, because they are still small, rather than raw edge applique. I wanted to have clear details and not have frayed edges around the face and hands. It is ok if a tree or rabbit gets a little frayed in a landscape, but not a person.An "a ha moment" when looking at the photo, gave me a lighter yellow at the top of the umbrella, where the sun bounces off of it. I used an orange colored pencil to shade the underside of the umbrella for more contrast. When the ribs are highlighted it will give more shape and definition to the umbrella, and adding the pink and fuchsia dots will add a lot of pizazz. I am linking this to Nina-Marie's Off the Wall Friday, click on the badge on the right hand column to see some other wonderful quilt artists.
Friday, November 22, 2013
Foto Friday - Negative Space
These photos could be about line and pattern, but to me they are about negative space. Do you pay attention to negative space when you are designing? The cast iron tractor grill, could have been symmetrical, but as the perspective changes, the negative space changes, even though the pattern is the same. The cracks in the wall, are just as important as finding the right fabric for the stone texture. Negative space can also be defined as silhouette, as this telephone line connector and the scroll ironwork show. Where the background is more important then the lines, then you are thinking of the negative spaces.I would use a beautifully hand dyed or painted sunset sky fabric for behind the scroll work. Or multi colored flowers for a garden scene. The tree branches would show up in stark contrast to a turquoise sky. The cast iron chair back has lots of detail, the Greek Key pattern depends on black and white, the fan is defined by the negative space wedges. Circles and the interior they define are classic shapes, overlapping circles have words for their negative space, apple core & football and these shapes can tessellate. The metal sculpture is at a lake in Washington, it has circles overlapping, but the negative space is very different from the razor wire. I think this photo would make a nice mosaic pattern with Japanese fabrics in the white spaces on a navy solid. Pay attention to the all the space you design with, not just the lines and patterns you are making, but the background, silhouette, and cracks. Try to make a negative in Photoshop to show you more options, to make the negative shapes the positives shapes.
Tuesday, November 19, 2013
Yokohama Award
Yea!! Our International Painters Challenge Quilts, won FIRST PLACE for Group Quilts at QUILT WEEK YOKOHAMA!!!! My Leonardo Da Vinci art quilt, was one of the 30 USA quilts entered in the exhibit. Three other artists in our Fyber Cafe group also participated. In addition there were 30 quilts from Japan and 30 from France. The US quilts were curated by Linda Stellar of Eugene, Oregon. Wow!! I am just blown away by this, I did not know they were in competition, I thought they were just for display. I am so proud to be part of this. Click here for the link to view the 30 US quilts. You can't really see anything, but this is how they were displayed in Japan.
Discharge Botanical Stencils
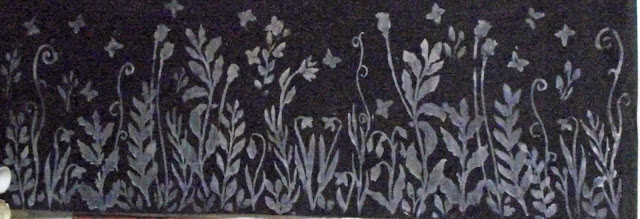
I saw someone using discharge paste on one of the "Off the Wall Friday" posts, click here The Quilt Rat discharged a simple feather stencil. So I had an "A HA! moment." I would use discharge paste with all the botanical stencils I had just made. I got out a piece of black fabric approximately 18" wide, by the 40" length, and started placing the large assortment of stencils onto it. With the large variety I had made, I only used them once each. That meant I did not have to clean them after each use. I tried to vary the heights, overlap them a little, and filled in the bottom with extra leaves. I used "Jacquard Decolourant" discharge paste with a foam brush, to paint the stencils. Trying not to get my sleeve in the paste, I should have worked left to right, duh! I put each stencil into a flat aluminum pan with water, to soak, then washed them off when I was all done. The next day I did the rest of the fabric strip, I decided on a table runner, not just the 25" x 18" I had originally laid out. After the paste was dry I used a steam iron to activate the paste. You can see how it goes from almost clear to gray to white. The steam helps get more bleaching action. But you don't know what underlying color the black is. I have seen black discharge to yellow, red, lavender, and green, they over dye odd colors. If you find one you like, go buy more!! Most of the fabric I've had has bleached to beige or rusty beige.These two photos are after it has been ironed, it turns a white-gray, so you know it has bleached, but until you wash it out, you don't know quiet how much.The whole strip, the top photo has been stenciled with product and ironed, the bottom has been washed and dried. You can see the color change after the washing, the final color is sort of a beige. It looked totally brown when it was wet, I thought I might not have ironed it long enough, but once dry it was fine. This is going to be so much fun to free motion quilt, rayon threads will give it some shine and glow. I'm going to call it "Midnight Moths." I can't decide if I want to add a border or not. What do you think? I've posted this on Nina-Marie's Off the Wall Friday, check out all the other wonderful quilt artists on her blog. Click on the button in the right hand column.
Monday, November 11, 2013
Color Pattern & More Stencils
Coloring in the "Waiting for the Parade" pattern, with colored pencils, gave me an idea of the contrast, value and color choices. It helps to color the pattern pieces, so I don't get them mixed up, when they get cut up. Coloring the background area, will probably be changed, I added fall leaves to the foreground, so the background tree will be Autumn colors too. I think a dark rich orange will offset the screaming yellow umbrella. Next is to put a piece of muslin over the pattern, and trace it with a Pigma pen, this will give me a foundation to set the individual pieces on, as they get cut.This is addicting! I've been cutting up more stencils and masks, with Botanical themes. Thin twiggy branches, mushrooms, and bluebells, thistles and daisies. I got tired of the Poppy pods as a focal point, having a variety of flowers will make it more interesting. I want to try some multi color paint combinations. Some of the pieces I cut from satin finish quilters template plastic, I set them on the Xray film for contrast. But I really like the dark Xray film for the stencils, the contrast helps you see what you are doing.
Saturday, November 9, 2013
Begining "Waiting for the Parade"
This is the inspiration for my next art quilt. I took the photo at last year's Veterans Day Parade, the girls were leaning out waiting for people to throw candy. One of the books I read on quilting people, is that it is not who you know, nieces, nephews, friends, but the body language and the story it tells. So I have tried to apply that theory to my pictorial quilts. I think the girls are cute, and posed well, the contrast in colors between the yellow umbrella and the pink, really pack a punch.This is the first sketch I made, with clear plastic, I cut up sheet protectors, and used an ultra fine Sharpie pen. I trace the main lines, then the finer detail, and try to simplify the background. They are standing at the curb, with an arched cement bridge rail in background, I eliminated the older girl, and put them closer together. Next I tried to add more background detail, made notes about contrast and colors, and then decided to crop it. Making the girls more of a close up focus. With a double line crop, I made the umbrella overlap the border, giving them more motion and emphasizing the leaning forward in the frame. I will make the border part of the picture, with those sections being a darker shadowy color for contrast. THE FINAL SKETCH--- I got rid of most of the background, making the girls the focal point, it has more POW! The polka dots on the umbrella will add a lot of depth and shape. The next step is to posterize this in Photoshop, blowing it up onto four pieces of paper, will make it about 16" x 20. I may go bigger to 24" x 30". The decision will be based how how small the smallest pieces are, do I need them bigger to make them easier to handle? Which size will give me the best view and ease of construction. This will be a raw edge applique project, now it is sort of like a jigsaw puzzle, cutting out pieces and fitting them together. I am not a wishy washy person when it comes to picking fabric, I go with my gut instinct. I don't hem and haw about my fabric choices, I make a choice, go with it, and if it doesn't fit later, I'll change it. I keep in mind value and contrast, whether a piece is behind or in front of another piece, creating depth. Studying color theory can give you a headache, but it is a very good basis for your decisions, then when it is time to apply color theory I use my intuition. Now it is time to PLAY WITH FABRIC!!!
Friday, November 8, 2013
Misty Morning Mauve
Another botanical Gelli Plate print, has been finished into a small wall hanging. I added layers of paint with stencils, sequin waste, and raw edge applique. The border fabric was one piece that graduated from pink to dark burgundy, when it was cut in squares, and rearranged it made a nice blended combination of fabrics. I really like the wispy, calm feel to these prints, they are very delicate. The addition of thread painted dragonflies, gives them a focus. See previous posts on the painting, printing & stencils for this technique. I've posted this on Nina Marie's Off The Wall Friday Click Here to Check out all these wonderfully creative people!
Saturday, November 2, 2013
Slightly Breezy
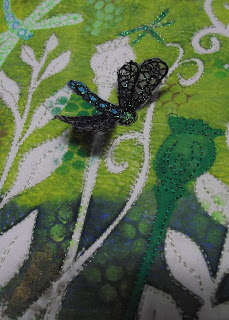
The full title of this piece is "Slightly Breezy with a Chance of Dragonflies." I made it from two 8" x 10" Gelli plate prints, sewn side by side. It is over printed with stencils in darker green and detailed with sequin waste, and a hexagon print, also metallic gold paint. I have added three 3-D thread painted dragonflies, with loose wings, only the bodies sewn down. It is for the new Fyber Cafe challenge, "Weather Report."I did not do any quilting in the background, as I would usually do, this left the stems and other details to show up better. The border is a Bali batik. I can't wait to quilt the other layered botanical prints that I made.
Stash Saturday 4 - Beads
My Favorite beads, glass ladybugs, they are a bit larger than 1/4". I sew them on a lot of my floral quilts, sitting on a flower petal or climbing a stem. I get them at the local annual Gem & Mineral Show at the Fairgrounds, but the dealer hasn't had any the last few years, so now I am kind of hoarding them. My stash of beads, in clear plastic divided boxes, there is a second smaller stack to the right of these. I have extra boxes, but no where to put them. You can clean up your room, get extra shoe boxes, but if you have no where for the shoe boxes to go, then it does not help. This is the position I find my self in, more stuff-no room for the stuff.
The first two boxes are basic seed beads, tubes and small bags, plain, iridescent & crystal. Also rocailles, gold and silver metallic, small pearls, and the next size larger than seed beads. I use these in flower centers, as a scatter across a large area, or to fill in an area.Next I have even more seed beads in larger quantities, and the out of place plastic lobster? He has been sneaking around from box to box, trying to find a home. I have an assortment of "Good" beads, specialty items, pieces from old earrings, vintage beads, and charms, small rubber animals, I sew on as embellishments, like beads. The variety is endless, lots of miscellaneous stuff and one of a kind items. I also have boxes of sequins, jewelry findings, miscellaneous, wood beads, plastic crystals, the only thing I DO NOT have is pony beads. I hate them!! I also have several shoe boxes of sea shells, many of them already drilled, but I do drill others with a small diamond drill bit, I add them to my undersea, tropical fish quilts.Then I have a shoebox of even better beads, strands of turquoise, rose quartz, hematite, pearl, lapis, stuff for making necklaces and jewelry. There are beautiful glass and shell pendants, as focal points. Most of these I got at Shipwreck Beads just outside Olympia, Washington. Click here for Shipwreck Beads. If you ever get a chance to go, please do, it is an amazing warehouse full of the most delicious stuff! You can order online, minimum order $25, which is very easy to do. I add beads to lots of my art quilts, it is the first thing I go to, to embellish anything. They add texture, sparkle, detail and color. Once you start collecting it is hard to stop. I'll never use all my beads, I have to accept that, just like I will never use all my fabric, if I live to be 200. But it is a palette of choices, to have a variety on hand, when you need just the right touch to make your quilt spark!
The first two boxes are basic seed beads, tubes and small bags, plain, iridescent & crystal. Also rocailles, gold and silver metallic, small pearls, and the next size larger than seed beads. I use these in flower centers, as a scatter across a large area, or to fill in an area.Next I have even more seed beads in larger quantities, and the out of place plastic lobster? He has been sneaking around from box to box, trying to find a home. I have an assortment of "Good" beads, specialty items, pieces from old earrings, vintage beads, and charms, small rubber animals, I sew on as embellishments, like beads. The variety is endless, lots of miscellaneous stuff and one of a kind items. I also have boxes of sequins, jewelry findings, miscellaneous, wood beads, plastic crystals, the only thing I DO NOT have is pony beads. I hate them!! I also have several shoe boxes of sea shells, many of them already drilled, but I do drill others with a small diamond drill bit, I add them to my undersea, tropical fish quilts.Then I have a shoebox of even better beads, strands of turquoise, rose quartz, hematite, pearl, lapis, stuff for making necklaces and jewelry. There are beautiful glass and shell pendants, as focal points. Most of these I got at Shipwreck Beads just outside Olympia, Washington. Click here for Shipwreck Beads. If you ever get a chance to go, please do, it is an amazing warehouse full of the most delicious stuff! You can order online, minimum order $25, which is very easy to do. I add beads to lots of my art quilts, it is the first thing I go to, to embellish anything. They add texture, sparkle, detail and color. Once you start collecting it is hard to stop. I'll never use all my beads, I have to accept that, just like I will never use all my fabric, if I live to be 200. But it is a palette of choices, to have a variety on hand, when you need just the right touch to make your quilt spark!
Subscribe to:
Comments (Atom)


