I had the luxury of not having Thanksgiving company, so no hurry to get dinner done. The house was clean and we were going to eat late, so I was able to play most of the morning. I told my husband not to bother me much, I was going to have my hands covered in paint and could not jump to help him every minute. And he listened, he gave me some uninterrupted time in my sewing room. When my sister was here, she had seen my resist dyed fabric and commented that they would make great prayer flags, hint, hint, wink. So that thought was in my head, I dragged out my box of Gelli Plate printed fabric instead. I had tons of fabric I had printed, but did not know what to do with it, all 8 x 10 inches. Just perfect for prayer flags. So I cut 14 pennant style flags, if I make one I might as well make 2. Then I cut a few more, and a few more, and so on. I might as well use all the fabric that I'd printed, I'm not going to use it for anything else. This is when my OCD manifests itself. The fabric was pretty, but needed some help. Several months ago I had made a bunch of "word" stamps with precut alphabet foam shapes, again the perfect combination, I love it when a plan comes together! I spent Thanksgiving morning stamping words onto all the flags, soul song, dream magic, fly, hope, laugh, try play, trust, be love, all sorts of combinations, onto 50 flags. Yes 50, I think big, by now I was thinking Christmas presents. It is SO MUCH FUN being creative, I was in the "Zone." I threw the turkey in the oven about noon, and kept right on going. My husband had an old movie marathon going on TV, and I kept him supplied with beer. Now the flags needed more, some of the dark prints needed lightening up, some of the blah ones, needed accents. More is better when you are talking paint layers, depth, complexity, and metallic gold, silver and copper. I embellished them Thursday afternoon, and all Friday morning. I'm on a roll! My husband knew I was feeling good, and knew I needed some time to myself, his constant care had been hard on me. I decided that I wanted to have 7 on a string instead of 5, so I began with a drawer full of binding scraps, sewing them all end to end, and ironing them into a double fold bias binding. I stitched the edges closed and inserted the flags in the same step, so it went pretty quickly. They ended up about 8 feet long, with a 12" tie on either end. I left the edges of the flags unfinished, they are made to flap and fray in the wind. Although with all the paint on them, I doubt they will fray much. At this point my energy was lagging, but I knew I had to finish them all, or the last ones would end up in a pile on my sewing table for "someday" to come
Here are some detail photos, I used a lot of sequin waste with white paint to lighten, and a few botanical stencils to add more interest, there are still some not so pretty, but that's ok, and it is hard to pick my favorite. I hung them on my living room drapes to take pics, but I am too far away to see any detail, so won't post all of them, but I had so much fun, having most of two days to play with paint and create. It was a very relaxing holiday. Oh, by the way we did get turkey, stuffing, potatoes and gravy, with home made dinner rolls. Just the basics, 'cause hubby doesn't like yams or cranberries, if you can't cover it in gravy, he doesn't care for it. I hope everyone's time with family was wonderful, my niece all ready posted on Facebook her 3 mile walk, show off!
I am linking this to Nina-Marie's "Off the Wall Friday" to see what other wonderful textile artists have done, click on the badge in the right hand column.
Art quilting, tips, techniques, thoughts and creativity. Textiles, antique quilts, fabric dyeing, fibers.
Saturday, November 29, 2014
Monarch Finished
The Monarch is finished, this photo shows the background color better. The orange of the wings is veined, and the flower detail is better with the stitching. I like the simplicity of the Monarch design, not too much to distract you from the main object.
Wednesday, November 26, 2014
Monarch of the Glen
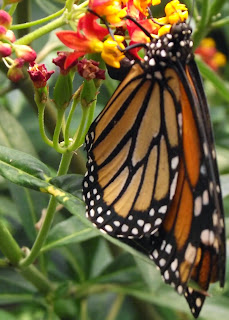
For several years now, I have been trying to use my photographs for quilt patterns. When I got the new Fuji digital camera, I was really jazzed about it, I took loads of pictures. These butterflies were at the Elkton, Oregon, Butterfly Gardens, part of the Elkton Community Education Center. They have an enclosure where they breed butterflies and raise the cocoons, It is heaven for photographing, but they still flit away as soon as I get the focus adjusted on my camera. For my pattern, I took the plant material from one photo and the butterfly from another.This is the full photo, as I traced it, but I thought it was too much blank space and not enough butterfly. So I cropped it horizontally, and focused on the butterfly. I did add a few more leaves, as most had gotten cropped out of the bottom of the pic. I like the strong diagonal lines, and the balance of the butterfly hanging off the bottom of the branch. I began with some of my hand dyed sky fabrics, I choose the lighter, almost turquoise fabric for the background. It sort of washed out in the photos, but it is a clear blue. Since I don't dye many orange fabrics, I was worried I wouldn't have the right orange, but I did. All the other fabrics are my hand dyed ones, except the black and the body. I had to simplify the flower shapes, 'cause they were too jumbled up. I could not tell if they were red or yellow flowers. I finally decided they were red petals, and the yellow part was the center of the flower, that popped up when it bloomed.I used "Wonder Under" fusible web, to trace my pattern pieces and fuse to the fabric, and raw edge applique to hold it all down. When you have very specific shapes, the fusible is the best way to transfer patterns and get every thing to fit back together. I am a little bored with it now, after doing the ram and the butterfly. It is like paint by numbers, once the fabrics are picked out it goes together with out much creativity. Thread painting helps the creative process, but this one was simple and boring. I enjoyed the doing the ram more, because the fabric choices were more important.
Most of the time I use muslin on the back with an off white bobbin thread, but I decided to use matching colors in the bobbin. The background area, I used a "teardrop" pattern of free motion quilting. The name of the wall hanging came from a TV series, from the BBC, called "Monarch of the Glen" the monarch on the show is the Laird of a Highlands Scottish Castle, trying to make the castle pay it's way, in this modern day and age. My husband and I have been thoroughly enjoying it, as TV watching is about all he can do. So we make popcorn and watch 1 or 2 episodes every night. I am almost done with the binding, then I'll post the finished pic.
I'll post this on Nina-Marie's "Off the Wall Friday," click on the badge on the right hand column to see what other VERY talented artists have been doing in textiles.
Saturday, November 15, 2014
Tie Dye Party
Last Sunday several (non-quilty) friends came over for a tie dye session. While the fabric soaked in the soda ash bucket, we prepared the dyes. 2 Tbsp of Urea in each pint bottle, with 4 or 8 tsp of dye powder, depending on the color. We made up 3 yellow, 2 turquoise, 2 fuchsia, green, black, deep purple, burgundy, fire engine red and a dark mix of an unknown(black or dark green), jet black and navy. Bonny, our tie dye guru, led us on the tieing session. She showed us how to tie a heart, a spiral, and a chevron. I showed them how to roll a T-shirt on a PVC pipe to do Shibori.We set up at the side of the yard, with wire racks, to squirt the dye on the rubber banded bundles. Susan dyeing her spiral bundle. Amy's tied heart bundle. Jenny got her self up off the ground for easier dyeing. Amy and Susan's Shibori dyeing on the PVC pipe. After we were done with our shirts, we had dye leftover, Bonny took what she needed to do more at home, and that left us 4 bottles of dye. I had soaked about a 3 yard piece of muslin in the soda ash, and I hung it over a swing frame. We each took a bottle of dye, yellow, fuchsia, turquoise and the odd black mix, and squirted it on the fabric to run down in streaks. The brilliant colors were like stained glass, as it dripped we added more, here and there to sort of balance the colors. The dark colors were a beautiful deep purple, navy, rust, brick red, lots of depth as it blended with the brighter colors. The proud dye team, Jenny, Bonny, Amy and Susan. Every one went home with the shirts in gallon zip lock bags, with directions to wait until tomorrow, then heat set the dye in the microwave for 2 minutes each, rinse until the water is clear, then launder with Synthropol. My Shibori shirt came out great, with diagonal turquoise, green and dark green. The rainbow spiral is my favorite, the colors blended well and the pattern is clear. Can you see the heart? I can't, the rubber bands must have shifted a bit when I tied it. But I do like the colors, burgundy, fuchsia, and some cobalt blue. The last two are going to be over dyed later, they are very splotchy, the colors did not blend and there is too much white. One is the chevron fold with accordion pleats, the other a quarter fold with each corner tied. I can't decide if it looks like a clown threw up or a confetti machine exploded! The fabric came out great, nice rich colors at the top, but the bottom washed out a bit, the dyes were probably exhausted by the time they dripped to the bottom. But the blend of colors is wonderful anyway. The photo is only half the width and length, it is really a large piece of fabric. Susan and her husband Larry, show off two of the T-shirts that she dyed.
I am linking this to Nina-Marie's "Off the Wall Friday" click on the badge in the right hand column to see what other wonderful artists are doing.
After the tie dyeing was finished, the ladies had brought the guys along too. They had gotten a good fire going in the fire pit, and we sat around all afternoon, several other couples came and we made a party of it. We BBQ'd burgers, hot dogs, and had lots of yummy side dishes. My husband Charlie had a great time, he was well enough to walk down the back stairs with just a cane, and the guys brought down his wheelchair for him to sit in. When I upgraded to a party, he kept mumbling "too many people," but he really enjoyed himself and had a special day. We went into the early evening, I being the only one who had to work the next morning.
Subscribe to:
Posts (Atom)