Art quilting, tips, techniques, thoughts and creativity. Textiles, antique quilts, fabric dyeing, fibers.
Tuesday, August 17, 2010
Removing Wax from Batiks
What a Chore!! Removing the wax from the batik fabric that I did at the workshop, was a real pain! I had made about 10 pieces, some of them had a lot of wax on them, by the time I had put on 3 layers. I layered the ironing board with about 6 layers of newspaper, a piece of wet, wax fabric, and 3 more layers of paper. A hot iron over the paper melted the wax, and it was absorbed into the paper, which had to be changed frequently. More paper, more ironing, change paper again. It took about 3 times with new paper to get most of the wax off. I made a mess! Waxy paper all over, wet dripping fabric and the plastic it was wrapped in. Now I can put the fabric in the washer and drier to get off the last of the wax. The soy wax is water soluble, but I want as much off of the fabric before hand as I can get, so it doesn't clog the plumbing, we have old problem pipes. As soon as the washer is done, remove the fabric, and while it is still warm, wipe the inside of the drier to remove the wax ring build up. I haven't had any problems with the drier, and the fabric comes out soft and pliable, with no stiff feel from leftover wax. Using old fashioned bees wax for batik is a lot harder to remove, lots of ironing with paper, and then boil the fabric on the stove, let it cool and remove the wax scum from the top of the water. This may have to be repeated and it still leaves a stiff feel to the fabric. You can also dip the fabric in gasoline(outside!) as a solvent to dissolve the bees wax, but I don't think I want to do that to my fabric!! But one of the ladies in my Fiber Art Group did that and it came out ok, I would worry about the fumes and the residue! When the fabric is washed I'll post photos of the finished product.
Monday, August 16, 2010
Dyeing Workshop 2010


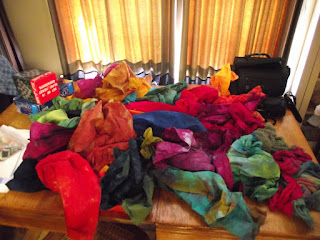
Our annual fabric dyeing workshop at Vera's was this weekend. We had loads of fun, even tho it got to 100' on Saturday, arrgh!! I was working on batik pieces that I had already waxed at home, and it was so hot, my cheap foam brush with the dye was rubbing the wax right off the fabric, what a mess. I put it aside at lunch time, and let it dry out back in the shade. During the afternoon I went down to her pottery studio- dye workshop, which had struggling air conditioning, and dye a quantity of fabric. I used a 3 layer technique, I start with one piece of fabric in a small tub, add dye, then fixative, then another piece of fabric, a second dye and fix, then a third layer. It helps if you don't stir the fabric, it blends and bleeds in some areas and not others, making a blotchy blend of colors on each piece. It is also fun to use very different colors, like eggplant(dark purple) +turquoise+ yellow gold. If you know your color theory you can kinda predict what it will make, but it is usually a surprise, cause you don't know how much it will blend or stay separate. These were my favorite types of dyeing to do. On Sunday we had it cooler, so I got to finish working on the batiks. I did about 10 pieces, they each got 3 colors layered on, with wax added at each step. The darker colors added last, really highlighted the lighter colors that I had waxed over. When I got home I ironed with lots of newspaper to remove some of the wax. It is a real pain to do, I still have more pieces to do later. The soy wax we used is water soluble with hot water and soap, but our plumbing is so old, I didn't want it coagulating in the pipes as the water cooled. I will finish it in the washing machine when I am done ironing as much wax out as I can.
Subscribe to:
Comments (Atom)