Wednesday, December 23, 2009
December
December has been a time of deadlines, finishing a few items of quilting for friends/clients and then finally being able to quilt something of mine. I quilted two lap quilts for my niece and nephew, got them bound and in the mail on Tuesday, probably won't get there on time but oh well, kids will like to open stuff the day after too. Now I still have a baby quilt to quilt for a neighbor, but that is no hurry. So... I can finally feel like I have the opportunity to do something I WANT TO, for a change. I need to do ART, with a capital A. Just play and have fun, I'm ok with deadlines, but recently they have been getting on my nerves, they are the priority, so I never get any of my things done. Now, what to do? what to do? Too many choices, painting fabric or collage, finish a project or start something new? Experiment or play with a favorite technique, I haven't had this freedom of choice for a long while. I am beading a scissor holder necklace for a Christmas present for a freind, I am almost done, only about six strands of beaded fringe left to do. I can only do a little at a time, my hand hurts so much, I'm getting arthritis in my right hand, on the knuckles. Very stiff and sore, I can hardly do any hand sewing any more, and forget about hand stitching on a binding. I do love to hand applique tho, so a little at a time. I have a few projects to finish, then I think it will be machine applique for me. I can do very nice machine applique work, I have done several quilts with this technique. Thin bias strips are easy, but sharp points are difficult, so I design with rounded tips on leaves and flowers instead. If it supposed to be rounded from the start, then you don't miss the sharp points.
Sunday, November 29, 2009
Playing with Photoshop

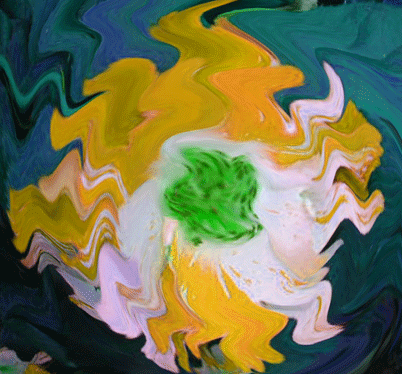
I have been playing with photoshop again. I got one pic I really liked from a photograph of a grid imprinted in cement, I changed the color, then distorted it with "pinch", then with "wave" It came out very interesting. So now, what do I do with it? Just use it for a printed fabric? Add something on top of it? Print it and do some thread painting on it? Decisions, decisions?
Palm trees
Went to California for Thanksgiving, got a good photo of Mt. Shasta in the snow, and lots of pictures of a group of palm trees. When is this Orgeonian girl gonna have another chance to take pictures of palm trees? Played with Photoshop elements some more, got it to layer pics finally, will need alot more practice. I tried to layer the palm trees with a sunset photo. But my sunsets are all horizontal and the palm trees are vertical, oh well. I'm using several quilt/photo books to get instructions, each one has a different way of going about it, and assume you know stuff that you don't. I'm trying to go about it a little systematicaly, but we'll see. It is not too simple, the options are overwhelming. Wish me luck with the program. I'm really enjoying the photography, I used to do alot of it. I have a really good Cannon 35 mm, with great lenses, but I was always getting behind on film developing, I still have about 5 rolls left to develope from 1-2 years ago. With the digital camera, it is so easy to take 100 pics. And putting it on fabric is a breeze, with the computer printer. I had two quilts designed in my sketch book, but those are some of the pics I lost when transfering to the new computer. I'm trying to get an idea of what will combine in an interesting way, I have alot of good background pics, and textures, but not much fore ground options. Except alot of seagulls, and ducks from the local pond. I may have to go abstract with the different filters, to get started.
Sunday, November 22, 2009
Photoshop Elements6


Wow, my new computer is awesome!!! I got the Photoshop Elements installed, and just started to play with it a little. I took a photo of a "Forth of July" Rose, changed the color and saturation, then distorted it with "Liquify" Wow!! Oh My God!! What fun, the picture actually swirls and marbles as you drag the cursor across it. So you can add as much distortion as you want. Now I could spend all day playing with this. It will be a challenge to go do the dishes.
Sunday, November 8, 2009


New Computer

I have upgraded my computer finally! To a Pentium 4, old one was a One, very slow!!!! It is nice to have speed, and a wireless connection. I splurged and got a bigger monitor, a 19", WOW is it ever big and clear. I took some pictures of a little bag I made for my CD player. I like carrying it with me when I go for a walk, but don't want to hold on to it. I still need to add a shoulder strap. I have always wanted to try quilting a piece of fabric and then painting it. This highlights the texture and detail of the quilting. I used a foam roller brush and metallic copper acrylic paint over a deep blue fabric. I used hot pink cotton thread for the quilting, so this adds extra color too. I added a twisted ribbon, yarn, netting, for a wrapped look, across the front of the piece and added beads and vintage buttons. It will hold my CD player and a few CD's, a strap will help, I want to find a nice cording to use, and twist it with several yarns.
Thursday, October 29, 2009
Fall leaves


We have taken several drives through the country side to take pictures of the fall leaves. Oregon dosen't have much red in the native trees, but lots of bright yellows in the maples and alders. I took a bunch of pics along the creek in Tyee and up along the North Umpqua by Fall Creek waterfall. The trail to the falls was closed but the lower area was very nice, we had a picnic along the creek perched up on the rocks. I am playing with the pics in photoshop, one of my favorite methods is to increase the contrast a bit, and then turn it into a negative. This makes the yellow leaves a beautiful blue/purple, I'd like to use several of these types of pics in my next wall hanging.
Sunday, October 11, 2009
2009 Portland Quilting Expo
Begining of September I took several quilt ladies to the 2009 Portland Quilting Expo, we had a great time. We laughed all the way up there for a 3 hour drive. We found the Expo center with no problems, and made it through the gauntlet of raffle quilts on the lobby. There must have been 10 raffles from different guilds and charity organizations. I only bought tickets for my favorites. The quilts at the show were amazing, I took lots of pictures, but I'm not going to post any of them, do to copyright issues. The machine quilting was most impressive, very dense, detailed and creative, lots of different patterns and threads, hours and hours of machine quilting on each quilt. They also had the "Hoffman Challenge" from Hoffman fabrics company, a national contest with a challenge fabric. I have never liked the fabric they choose, so I've never entered, this years fabric was a paisly in gold, tan and bugrundy. It created some very toned downed quilts, not bright colors, but they were very beautiful and creative. They also had an Art Bra display for auction, to raise money for breast cancer. They were lots of fun, especially the names, I love a good pun or funny title. One that had grapes and leaves on it, was called "Squeeze me, crush me, make me whine" an ode to a mamogram. One had gold lame, rhinestones and mega size tassles, called "Titz 'n Glitz", one with teacups on it was "T-cup" you get the idea. My favorite quilt was of a sea turtle, in blues and teals with batik fabrics, very realistic and creative quilting in the background. Another favorite was a portrait of a girl with a collie in ther lap. I could have spent alot more time there, just looking at the quilts. We went across town, and had a picnic lunch at a park, and went to Fabric Depot, a huge fabric store that had been invaded by the hoards from the expo. On our way home we stoppped at Greenbaum's Quilted Forest in Salem, several of the ladies wanted to know how to find the place. It is one of my favorite stores, we all bought some Paula Nadelstern kalaidascope fabric and matching prints, in different colorways for a challenge. I haven't the faintest idea what I'm going to do with it, but it is beautiful. We got back just before 8pm, a very long, fun day, we are on again for next year!
Balloon Ride


Last weekend Charlie and I went to Myrtle Creek Balloon Festival, it was a small local event, they had a small art fair, pancake breakfast and several balloons from Rouge Valley Balloons in Grants Pass/Medford area. They were giving tethered Balloon rides for $4, a great deal for me, I want to go!! It was getting a little breazy, so they were going to shut it down, but took a few last people for rides. I got to go, but we didn't go up very high, you could feel the wind on the balloon, fortuneatly it was pushing us down. It was lots of fun, a real thrill, next time we'll go earlier in the morning when the wind is calmer. They said the day before they had four balloons, but the wind had come up and broke the ropes! They ended up crashing on the other side of the airfield and a lady broke her shoulder, and two of the balloons were trashed. The guy I was with said it was a wild ride and he was hiding in the bottom of his basket. They were big heavy ropes tied off to pickup trucks, hard to imagine them breaking. Charlie said he saw me on TV news on Monday morning too.
Saturday, September 5, 2009
Eagles photo
 Isn't he cute!!!
 OOPs downloaded two eagle photos.
I have used the Eagles photo I created in photoshop, to make a quilt top. It is a collage of my hand dyed fabrics, with the photo in the center. I added some silloettes of larger eagles cut outs on either side, with branches reaching into the picture. It is all in bright colors of magenta, purple, teal, and lime green. The quilting will help define the branches, so they don't melt into the upper background. I haven't decided about adding a few pink flowers on the lime green leaves, it might be too distracting from the eagles in the center. I have finally found a great artist quilts photo book, it has the style of quilting I really admire, to use my own landscape photographs and colors, and altering them in an artistic way. I can do most of the manipulations on my Microsoft photo editor, and MS Paint programs, but I will have to get Adobe Photoshop Elements to do alot of it. The book is Artistic Photo Quilts by Charlotte Ziebarth. The previous books I have gotten show, scrap book kind of things, cut and paste, cutesy, or too complicated So you can't even recognize your photos. Last weekend we went to the local animal park and I took alot of photos, just playing with my new camera. The flamingo and alligator pics turned out real good. Also they had a baby camel, so cute!!! He came right up to the fence so we could pet him, he has huge blue eyes, and long lashes, so soft to pet, but you still wanted to be careful he didn't spit, ha ha ha.
Sunday, August 30, 2009
Fabric book, continued
I have worked on the pages of the book, two at a time, in facing pairs, and tried to develope a theme in each set of pages. Sometimes it was just a color theme, supported by vintage buttons and flower and fabric choices. Other times it was an element of the decor, birds and birdhouses, rabbits and violets, copper bells, the Tonka trucks were fun to work with, I added wheels and construction elements, pink flamingos was fun too, I added vintage pink rhinestone buttons, palm trees, and other flamingos. On several of the garden scenes I carried the picket fencing up to the page design. I added lots of tree branches with various leaves and silk flowers. All the silk flowers are beaded, as well as all the fabric butterflies and dragonflies. Beads and embroidery accents help blend the buttons to the page, so they don't stick out so much, a cluster of beads helped the buttons, so they didn't look so out of place, just stuck there for no reason. I used a little bit of paint , gold around the edge of the sun, some stamped leaves, and I made a wire rug beater to sew onto a page and used it to stamp the design onto the page also. I notice there is a lack of ribbon and lace, it just didn't come into usefullness with the garden scenes. I did embroider a few words onto the pages. I also used some metal tags with words on them. I was limited to useful words that I could find in the collection at the store, if I could have printed my own, it would have been unlimited. But it was a challenge to make a cohearent phrase out of the choices I had. Although going through the tags was lots of fun! I also found some metal letter beads that I had gotten at a garage sale, I spelled out Joey's dog "Summer" on the back page above her photo. Of coarse I didn't have enough letters to do Aurora too, so I went and got some plastic letter beads. You always run out of the useful letters, the vowels and s, t & r. And then you have to go buy another pack of beads. So you end up with a whole bag of q, z, x and j. I finally finished all of the embellishments, what fun it was palying with all the "STUFF" My table was piled high with fabric, bead trays, button boxes, embroidery thread, boxes of silk flowers, and tons of other stuff. It was great to use some of the stuff I had been hoarding. Now onto assembling the project into an acordian style book.
Fabric Book Photos


Here are a few photos of the fabric book pages, the edge trim has not been finished on some of them.
Friday, August 28, 2009
Playing with Photoshop


I have been playing with my photo editing software, I created a picture of two eagles in a tree with flower foliage in the foreground, with an intense sky background. I started with an old photo my Dad took of a bald eagle on the telephone pole at my sister Vicky's. I took out the phone lines and cut it out and put it onto a color enhanced background of a rusty truck. Then I added a second eagle, reversed. Then I added some flowery foreground and sharpened the contrast and adjusted the color a little bit more to blend it all together. I think it turned out pretty good for my first try at creating a unique picture. There was a little more manipulating than that brief discription, but that is the simple version of what I did. I am also posting the original photos and the end result.
Sunday, August 23, 2009
Sepia Garden Book, part II
I have been embellishing my photo pages, with everything from beads and buttons to charms, feathers, metal washers and a penny, paint, silk flowers, cardboard cutouts, embroidery, even a rubber pig!! It has been an adventure just collecting things, Joann's fabric was having and end of season button clearence, 80% off, Michaels Crafts was having a sale too, I went to a local auction and a lady bought a box of junk jewelery and we shared it, I got all sorts of weird stuff, chains and charms, a kitten button and I gave her $1 When I have been stumped on what to add, I have gone to my vintage button collection from my mom. A friend Suzie from quilt guild came over and we went through Mom's button jar, Suzie is a serious button collector, she just went to a West coast button convention, she found a small stash of interesting buttons from Mom, and I got all the fun ones she didn't want, but she lectured me on all the different types and what era they are from. I came home with a big zip lock bag of them. Mom's jar is not just any quart jar of buttons, it is a five gallon glass pig jar, full of buttons, that she picked up at fleamarkets and such in the 70's. we had lots of fun going through them, we poured them out onto cookie sheets and picked through them for hours. Suzie didn't believe me when I said five gallons!! I'll get some photos of the pages next time I am online.


Sepia Garden Book, part I
I started on a new project with photographs I took at my sister Vicky's, up in the Seattle area. She has a beautiful garden with lots of funky stuff, it was stuck here and there in her flowers. I started taking pictures on the "Sepia" setting on my new Canon digital camera. I loved the results and took alot more. With a digital camera, the view finder shows you a sepia view, not color, so I was able to really see how much contrast there was, how much shadow and light. I had never been interested in taking Black & White photographs before, because I couldn't see what the outcome would be. But with the digital cameras, it gives you the actual picture in the view finder. I had always admired the B & W pics my sister had taken of her kids and my friend Sue L. in California had taken alot of B&W too. Taking B&W pics of your partially finished quilts, will give you an idea of wether or not you have enough contrast in your fabric choices, and your quilt pattern. I think it will be a usefull tool, instead of looking at "watercolor style" quilts with a ruby red viewfinder, you can use a digital camera. I took almost 50 pics when I was there, all sorts of stuff, pink flamingos, wicker chairs, old granite ware pots with succulents, wrought iron garden art, sculptures, birdhouses, lots of nic-nacks, no flowers though, all just "Stuff". I did take flower pictures in color though, mostly lilies and dahlias and marigolds at this time of year. We did pick lots of blueberries, tho I missed out on the blueberry pancakes. ;-( When I got home I wanted to make a quilt with some of the pictures, so I started printing some of them out on my fabric, that was treated with "bubble Jet set,' and backed with freezer paper. I put it through my computer printer and printed two to a page. After removing the freezer paper I heat set the fabric/ink with an iron, if making a quilt or pic on a T-shirt you want to rinse out the excess ink first, then iron. As I was working on them I decided to make a fabric book instead. So I started sewing the individual pictures onto a cotton backing with strips of fabric around them "log Cabin" style. These individual pictures will then be embellished and put together as an acordian style book.
Thursday, August 20, 2009


My next project is fabric books, with my photos printed onto fabric treated with "Bubble Jet Set"
These photos are of a small sample book, of 6 rose pictures, that I made to try the hinge and construction techniques before I put together my bigger project. My big project is a dozen pages of sepia garden photos I took at my sister Vicky's. They are highly embellished with vintage buttons, charms, lots of beading and silk flowers.
Batik Photo of Amy
 Here is a picture Bonnie S. took of me at the dyeing workshop, working on the floral piece of batik.
Saturday, August 15, 2009
Fabric Dyeing, Conclusions and Results
I took my fabric home with me and rinsed out the pieces had done with low immersion dyes, they are the sets of 3 in the photos, that have no printing on them. On the waxed batiks, I remooved as much wax as I could with lots of newspaper and a medium iron. I swapped newspaper frequently, and went through alot of it. Put down slick, glossy pages on the bottom to protect your ironing board pad. After removing alot of wax, the fabric was still stiff and bits of excess dry dye was splotched on it. I washed the fabric using my washing machine, HOT water and a capfull of Synthrapol detergent. Immediately after washing I put them in the dyer and wiped off the wax ring in the washing machine. It was still warm and soft and wiped off easily with a paper towel. The fabric came out beautifully with no stiffness that traditional bee's wax batik has. The soy wax was much easier to remove, being water soluble. The bee's wax needs to be boiled to remove the residue of wax, a much more complicated process.
So the soy wax has several advantages.
1. It melts at a lower temperature.
2. It is white, not yellow brown so you can see truer colors on previous layers.
3. It is water soluble so wax removal and cleanup is easier.
I got bee's wax locally from a bee/honey guy for $3.50 a pound
The soy wax was $4 a pound from Dharma with shipping for 5 pounds it came to $6.00 a pound, and I shared the extra wax with my friends in Fyber Cafe.
Now I need to find something fun to do with my finished fabric!
I hope you have enjoyed my first atempts at blogging. AMY
Thursday, August 13, 2009


Part III, continued
Part II continued, oops, I was trying to spell check those last two words and thought I had deleted the whole entry. So please forgive the spelling mistakes, I know they are wrong, but it published instead of corrected the words. At least it wasn't lost. Spontinaeity, and intuitiveness, however they are spelled, are the driving force of the day. It probably helped that I wasn't "drawing" anything, if I had drawn lines, swirls or shapes, I would have been "thinking" about what I was doing with my hands. What way should the line curve, "oops, wrong way" making judgements about my decisions. This was so "freeing" letting it flow. The last workshop, when we were painting with the dyes, that is what happened, we were trying to make something, a picture, trying to control the outcome, instead of just making a mess with dye layers, imprinting, marks and color. We had brought lots of tools for printing, bubble wrap, brayers, string, rubber stamps, and masking tape. We were still trying to "DO" something with it. Instead of just playing with texture, colors, layers. We were hesitant, unsure of our tools, or techniques or what we were trying to achieve. I can really see alot of growth in the way I approached this workshop. Maybe just the excitement overwhelmed me. I was so focused on what I was doing, I didn't even pay much attention to what other people were doing. I answered questions, passed tools and paper towels, tried not to get in the way or get run over when I put my fabrics out to dry. I stayed focus on what I was doing. No bathroom breaks, no stopping to take photos, I hardly wanted to stop for lunch. But it was especially nice not having the phone ring, my husband wanting to go out, stopping to sweep the kitchen floor, just because I went in there to get a paper towel or rinse fabric in the sink. All the thousand different things that interupt our daily lives, interfereing in the process of making art. Just playing and having FUN!!
Adventures in Fabric Dyeing, part III
Adventures in fabric dyeing, part III. Time flies when you are having fun!! Intense focus is the best way to describe the day. I didn't want to waste a moment of it. I didn't worry about decisions of what to do next, I just let it flow, I suppose you could call it creativity. I wasn't trying to be creative, just letting things happen naturally, not OVER THINKING any of it. Letting my subconscience make the decisions, working intuitively. I already know color theory, balance and design fundamentals, so I let my inner child make the decisions, based on everything I have absorbed in past years of learning. I was certainly working in repetitive patterns, stamping the wax. But there were no rows, no eveness or symetry. I turned the shapes every which way, overlapped them, and put them off the edge of the fabric. Spontonaity and intuitiveness
Adventures in Fabric Dyeing, part II
Adventures in dyeing , part II. The night before the workshop, at the last moment, I decided I eeded to prep some already dyed fabric, to get one step ahead of the game. I found several lightly colored pieces from previous workshops, some were done with liquid Rit dye. I soaked them in soda ash mixture, set them out to dry for awhile, then lightly ironed them smooth. I remember Vera saying not to scorch the soda ash with the iron. I set up newspaper to absorb excess wax, on the dining room table, with the skillet set up to melt the wax. I only used a stamping process, covering the entire fat 1/4 with abstract patterns. I used the circle edge of a plastic cup, the bottom of two different thread spools that looked like a half of a lemon, cookie cutter flower and heart shape, and the parralel wires of a pastry blender. I did six pieces of fabric, two of them plain pieces of muslin, not pre-dyed. I am glad I pre made fabric for the batik, it saved alot of time at the dye workshop to have one layer of dye and wax already done.
Arriving at Vera's, I was so jazzed up, I couldn't wait to get strarted. We covered tables with plastic tableclothes, and mixed the dye concentrates into sodium algenate too make thickened dye paste/paint. Quilting Arts mag, recommended the dye be thick like honey, but I thought it needed a little watering down to seap in and spread around easier. Beacuse the soy wax is water soluble you don't want to do imersion dyeing.
I was so focused, so intense!! Just buzzing with excitement! I started painting dye over the already waxed pieces. I used a medium color, green or turquiose. I didn't worry too much about the color outcome, just something in the mid range value wise. The flower piece I added fuschia that came out a nice bright pink. Slapping dye over the entire piece of fabric, no detail painting. I laid the pieces out in the sun to dry the dye, while I worked on the next piece. After they were all dyed, I started melting wax for the next layer. I laid down newspaper and stamped several pieces with extra designs, the spools and pastry cutter. The flowers and circles I painted with a foam brush, leaving the background unwaxed. I also splattered some areas with dots of wax. After the wax had set I used aother layer of dye paint in a darker color, adding navy to anything seamed to work for me. I used a dark green, navy, a red+navy nice dark purple. It was amazing to watch as the background color got darker and the designs with wax stayed in the same bright colors that I had waxed over. The magic of batik! Contrast was more important than color, you need something dark at the end, so your design will stand out. Laying the pieces out to dry at this point, was a mistake! The sun had gotten hotter, and melted the wax. What a sticky mess!! I moved everything into the shade to dry. I couldn't wait to see what it all looked like with out the wax.
Adventures in Dyeing, part I
Adventures in dyeing, part one.
I was very excited about going to our Fyber Cafe fabric Dyeing workshop at Vera's. She is our dyeing guru, mentor and retreat center. Once each summer for the last three years our textiles group has gone to her place for a dyeing workshop. I kew I wanted to try soy wax batik, like I had seen in Quilting Arts magazine, issue 35, Oct/Nov 2008. I ordered the wax from Dharma and collected supplies for stamping, in my kitchen and at the Dollar Store. I got cookie cutters, pastry wire blender, thread spools, and other tools to make marks with the wax. I searched and searched for an electric skillet. I made a mad dash one morning to all the local thrift stores and Salvation Army and Goodwill stores. No luck. :-( In the afternoon I went back to the SPCA thrift shop that had been closed in the morning, and found just what I wanted. $5, almost new, mid sized, not gigantic. It would fit two aluminum bread loaf pans with melting wax. I had intended to use Bee's wax in one, and Soy wax in the other, and to try both. However the soy wax had a much lower melting temperature, so I used that exclusively.
Wednesday, August 12, 2009
First photo
The quilt photo I posted is called "Race Around Osaka Castle" it is entered in an international exhibit entitled "International Festivals" The international festival I was asigned is the Dan-Jiri Harvest Festival in Osaka, Japan. The quilts are being shown in France, New Zealand and the US. There are 30 participants from each country, who have been asigned a festival from around the world, to make an art quilt for.
My First Comments

My first comments on my blog, I hope this is easier than facebook, ha ha ha. My computer is old and slow, so it dosen't always do what I want, when I want it. I would like to blog about my art quilting, my creativity, my ideas and textile techniques. I would like to add photos of my work in progress, and completed quilts/projects. I am involved in a textile arts group called "Fyber Cafe" and we are always striving to improve ourselves as artists, to learn new techniques and practice old ones, to support each other and give constructive comments and encouragement. The show and tell is a big part of that process and I am hoping that this blog will give me some of that same feedback and encouragement, and a place to express myself.
Subscribe to:
Posts (Atom)