Tuesday, July 31, 2012

A Lil Bit 'O Fun

I've been playing with some small gift items, a change purse from a Valori Wells pattern. I made several with ladybugs, frogs, butterflies and cute sewing mice. They are quick and easy, and nice to have around when you need a quickie gift. I need to go buy more snaps, or start using Velcro for the closure.


I fussy cut the butterflies and the mice, and the only problem when using a directional print like the frogs, is they end up, upside down on the flap. The lavender leaf print was a Gelli Print I made with acrylic paints, I added some free motion quilting to it, to get more texture. None of them have batting, but there is a layer of heavy iron on interfacing.


There was a fun little zippered bag on a blog, and I kick myself because I did not write down the name of the blog. I thought I had saved it, but can't find it now. Any way, I used two of the pieces of discharged fabric I made with the decolourant, and lavender zippers. They were also very quick, but I wish they had some lining for a stabilizer, to hold their shape better. Maybe some interfacing will help.

Sunday, July 29, 2012

Muslin & Tissue & Cheesecloth

I have been working on the July project from the blog andthenwesetitonfire.blogspot.com it is a process of layers of muslin, tissue and cheesecloth. First muslin was dipped in a 50/50 mixture of white glue and water, wrung out, scrunched up, and left to dry. My largest piece, I pulled up from the center, and swirled it around in a tight twist, another I folded length wise and twisted into a tight rope. Two small scraps, I just wadded up into a ball.


After I left it outside to dry all night, I un-scrunched it, and laid it out to dry some more. I was concerned that I had not used enough glue, as it wasn't very stiff. The next step is to put on layers of tissue paper with more diluted glue. I thought "easy," I'll just dip the tissue in the glue. Big mistake!! It turned into mush. Ok, try again, use a foam brush to layer on the glue, tissue and more glue. This took a while to make sure all the areas were covered, and it got wet enough that I worried it would flatten out. Again, it took all night to dry, but was much crisper, and held it's shape well. The tissue gave it more wrinkled texture too.


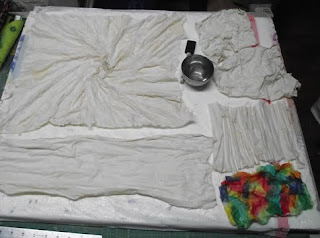
On one of the small scraps of muslin, I decided to try colored bleeding tissue, instead of plain white. I ripped off small bits of various colors, and glued them down, overlapping slightly. It gave a very clear stained glass effect, I wish I had color coordinated the tissue, instead of using a rainbow. A second small scrap, I had accordion pleated and decided to paint with acrylic paints. I used various browns, tans, yellow and then highlighted it with metallic copper. I was trying for a tree bark like texture. I don't know what I am going to do with the stained glass piece, just a sample, but the bark, I'm going to work on with thread wrapped pipe cleaners and fabric beads.


Now for the main piece of fabric, the next step was to add strips of white cheesecloth to the layers with more glue. Of coarse I had to go buy more cheesecloth, 'cause all of mine was dyed. It was quiet expensive for a package, in the canning supplies section, I'll have to check for yardage at Joann's Fabrics next time. It took at least an hour to cover the muslin with strips of cheesecloth, it stuck to my fingers, didn't stick to the muslin, lots of glue, draping it over the ridges and dips of the scrunched fabric. It added a LOT of TEXTURE!! Wow! It was worth all the effort. More drying time, I'm glad I wasn't in a hurry to check out this process, it was quiet a few steps to follow. This was as far as the directions went on the blog... what next? I had already tried several "what ifs?" with the colored tissue and the paint. I checked the blog, waited, no new posts, it had been over two weeks, some of the other participants should have tried it by now, and added their thoughts. By now I had an idea of what I wanted to do with it, it had a nice swirl to the fabric, around a peak in the center. It is going to be named, "Seaweed Vortex" and the next step is paint. I thought about using Tsukineco Inks, but choose to stay with the acrylics, I used a foam brush with dark green, olive, dark teal, med teal, turquoise, light blue and light teal radiating from the center, getting lighter towards the edges. It was tough getting paint in all the crevasses, I watered it down so it would run, and even had to go back with a fine brush and do touch up. I also highlighted it with metallic silver paint.


Now for the final touches, I plan on adding my hand dyed cheesecloth, fanning out from the center in bright colors, like coral and seaweed. Also adding real sea shells, maybe glued, maybe stitched, and beads, and fish buttons & charms. Glitter? A mermaid? Angelina? This is the fun part. I can't wait to see where my imagination takes me. It is a very textural piece of textile, definitely NOT a quilt! So it is very different from what I usually do, stepping out of my comfort zone. No stitching and quilting at all, which is what I really do best. This is textile arts at its most basic definition. New viewers, check out August giveaway on the newest post.

Jacquard Decolourant

Some of my finished pieces of discharged fabric need a little something extra, so I got out my Shiva paint sticks and added a copper metallic to the ginkgo leaves. I used the same small and large stencil that I had used to discharge, and added copper leaves all over the fabric. Now it needs to set a few days, and heat set with an iron, and then decided what I want to do with it.


I also added silver metallic paint stick to one of the pieces of fern fabric that I used the Declorourant Plus white on. Painting the ferns to overlap a little bit, added another dimension to the layers, and a ghostly silver/white. Is the picture clear enough to tell the difference between the tan discharge and the silver Shiva?


Several pieces of what I think are navy blue Kona Cotton fabric were floating around my table, so I did some more decolourant plus white, onto them. I used several different stencils, leaves, flowers, maple leaves and a smaller curly cue pattern. You can see in the one photo were one of the fabrics is only half coated with the decolourant. I've got them rinsing now, so I'll see if I got a good navy/white or if it discharged to tan.


Now to dream up another project to use the fabrics on. Any suggestions?

Thursday, July 26, 2012

Stone Washed Leaves

The piece of discharge fabric with the large tropical leaf stencil was intriguing me, I thought it looked like stone washed blue jeans. I decided I wanted to quilt it wholecloth, and not cut it up. So I went through my Bali batiks, and some other fabrics until I found an assortment to go with the leaves. Kind of a gray, peachy, tan, and creamy, color blend.


While cutting strips up for a border, I decided I did not want a symmetrical square quilt, it was too much black in the center, and I was choosing light colors for the border, to match the discharged areas. The resulting border was added on the left and bottom, with strip sets of the batiks, and a narrower plain border on the top and right. Choosing the width of the plain border was a challenge, I even asked my husband's opinion. He is very good about constructive advice, and I often take it, but he accepts that I go my own way occasionally. So I have no problem asking him, when I can't make up my mind about a decision.


The quilt top went together quickly, and the next morning I started quilting on it with rayon thread. I choose 6 different colors of thread to quilt in the leaves, one for each shade of leaf, gold, lavender, cream, silver, charcoal, and rust. I don't know if it made any difference at all, it is not very noticeable. I used an outline/echo quilting pattern, and used the same in black for the background and border. I finished it in a solid black binding, with the backing and sleeve black also.


The three photos of the whole quilt are, the top only, and then after the quilting, and a closeup. I think it looks very crisp and modern, but it also has an Egyptian look to it, especially with the quilting in the background, which is hard to see in the photo. So I am very pleased with it, it is a beautifully shaded piece of fabric, and not cutting it up, really showcased the discharging.

Tuesday, July 24, 2012

Discharging Fun

Yea, Peggy came over and we got to play with several different types of discharging. I started with a spray bottle of 50% bleach over leaves placed on black fabric. No results, more spray, nothing happening, we worked with other products and kept patiently checking the bleach spray. Finally my husband brought out a new bottle of Clorox instead of the generic bleach we were using. Instant results, so check on the strength of any generic bleach you have, we watered it down and it was too weak. Lesson learned the hard way, we wasted an hour and a half waiting for the bleach to NOT work. In the mean time we played with Soft Scrub, with added bleach, and two generics from the Dollar Store, a scrub and a gel. We carefully sponged them over stencils, again nothing worked. The generic products are too weak, when we finally stirred in some Clorox, it finally started to change color. One of the things we had learned previously was that chlorine evaporates quickly, if you put Soft Scrub on a paper plate to work with it, it will loose strength the longer it sits out. So we had added bleach, unfortunately it was the generic. We finally got things going, about noon, and decided on a coffee and lunch break.


Since things were finally working we decided to keep going, because it was a nice cool day, and all the supplies were already outside. Peggy continued to work with the scrubs with added Clorox, the scrub gave some color/texture/thickness to the paste and you could see what you had painted onto the stencil. She redid some of the pieces she'd already stenciled, giving her a two tone appearance, a very bleached out white and a rusty area. With the bleach products, we also had a bucket of Anti-chlor from Dharma, which we soaked the fabric in for 15 minutes, and then rinsed in plain water. WORK OUTSIDE with bleach products, my picnic table and deck were perfect for this, but our fabric kept blowing away in the wind. We used clear flat marbles and rocks to hold everything down.

We both tried Jacquard's Decolourant, the regular and the Declourant Plus with white dye. After stenciling onto the fabric, the piece was left to dry, and then ironed to activate the process. It was hard to tell how much to iron, as the white paste still remained on the fabric, and the directions said the longer/hotter you iron the more it discharges. The fabric was then rinsed in plain water, and you could see the black dye wash out, it looked purple and we hoped the stencil would have a purple cast to it. But it rinsed out to a tan/white, you could see the brush strokes and the different areas where the iron was on longer. Also some of the iron vent holes appeared in the print, but we both liked the effect, so it wasn't a problem. Lesson learned, keep the iron moving.


We decided that our black fabric was probably "Country Classics" from Joann's Fabrics, I had bought a bolt on sale, but we also had some scraps, who knows what that was. The regular Decolourant left the fabric with the underlying dye color, and the Plus with white, left a white washed sheen to the areas that were discharged. I tried a piece of fabric with both types, and the effect was very nice together, subtle color changes added variety to the print. I used mostly fern, Gingko, and a large leaf stencil, Peggy had a bird on branch stencil, leaves, butterfly, and other bugs. The results were very different from the Clorox to the Decolourant. At the end of the day, I stenciled declorourant onto a dark pink 100% cotton T-shirt, after drying it ironed and rinsed out to a yellow under dye. It needs to be rinsed and then washed to see the final results. I'll add a picture later. I think I will add some Shiva oil sticks to the gingko fabric I printed, maybe the ferns as well. The large leaf print I am already working on, I'll post it the next time I blog. We had a great day, thankfully it was cool enough to really enjoy, a slow start, but we are happy with our final results. We learned to work out our "what ifs" trying to make everything work, trying different products, and techniques. It's great to work with a friend, I would have stopped half way through if I had been by myself, but setting aside the time to really try it, with a friend, was great fun.

Sunday, July 22, 2012

Anticipation

I am WAITING for fun! Tomorrow my art friend Peggy is coming over for a play day. I have been wanting to work on some discharging, but I had to wait for my Dharma order of anti-chlor, it came quickly, now I'm waiting for my friend. I'm also waiting for our dye workshop in two weeks. I have wanted to try marbling for a long time, so our textile arts group "Fyber Cafe" finally got organized to try it at our workshop. We will be using paints, not dye, but we felt we needed enough space, and the outdoor environment(sort of in an open garage) so we could all work on it together. The anticipation is killing me. We got a marbling kit from Dharma, and one of the ladies in Fyber Cafe has all the trays and combs for us to use. I am sort of organizing this effort, so I need to cut up strips of newspaper, and get some supplies together. Also in the plans is ice dyeing, we have had several show and tell efforts to "ooh and ahh" over, and I am drooling to get started on this too. When I get to the workshop, I just vibrate with excitement!! and just have to go, go, go!! It is the highlight of my summer!! Heavy use of exclamation marks. So with all this fun running around in my brain, what to do in the mean time? I have been working on this months challenge for the site andthenwesetitonfire.blogspot.com using muslin and watered down glue to make a crumpled-textured fabric, I have layered on tissue paper with more glue, and the next step is cheesecloth. But I have to go buy more cheesecloth, as all that I have is dyed, I have no white cheesecloth. This is the second time this has happened, I want white, and it is all dyed! I assume the next step is to paint the fabric we have created, but who knows, I'll have to check back on the site, and see what is next. So my creative juices are flowing, but I CAN'T WAIT!!

Friday, July 20, 2012

Wild Cats Art Caddy

I made a second art caddy for a friends granddaughter, using a bright print. The front has a blue background with bright waves of color across it, and the lining is a bright cats print. The front pocket has the cat print and a cat button with a heart on it for the closure. The main closure is a ladybug button. I have extra watercolor paper and colored pencils, I'll go to the dollar store for a watercolor tray and brushes to add to it. She loves to do art work and this will certainly encourage her. I also added a rainbow carry strap on the side.


Wednesday, July 18, 2012

Art Supply Caddy

I have been wanting for a while to make something to take a few art supplies on the road, or at least just have them handy for my sketch book. So I made an art supply caddy today. I used two fat quarters, added interfacing and some batting, stitched them together, and turned it right side out. The bottom 5" only has stiff interfacing, and it got folded up to make pockets for the supplies, 6" x 8" watercolor and brown craft papers, 24 set of colored pencils, 99 cent kids watercolor tray, brushes and an assortment of pens/pencils. The main back section has the thin cotton batting, and the top two inches has no filling. The top flap folds down to keep everything from sliding out, and has a few snaps to hold it in place. I learned from my mistakes, of having all 24 colored pencils loose in my backpack. I added a small pocket with flap to the out side front, for a small pencil sharpener, eraser and pencil leads for the mechanical pencil. The whole piece works as a three fold, right side in, then front side over the top, and is held together with a large copper leaf button and hair scrunchy, a button and scunchy are also on the pocket flap.


I did not add any embellishments, like the book covers, I just wanted to see how it would work out first. Maybe the next one can have some applique, or hand printed/painted fabrics. I think these would make some nice gifts for any artists that you know. I have been following sketchbbokchallenge.blogspot.com and have been inspired to improve my drawing skills, and add a little color to my sketch book. I have always doodled and drawn quick sketches of quilt ideas, but I wanted to practice my drawing. Their monthly challenges are fun to try, and all the examples from their group of artists are inspiring.

Tuesday, July 17, 2012

Redwing Blackbird, Finished

The redwing blackbird from my photo was a fun project, it finished quickly, like I thought it would, and I did not get bogged down with any complications. After choosing the hand dye for the background, I use Bali batiks for the leaves, an assortment of greens, starting with darker ones in the back, and lighter and brighter ones in front. I placed the fabric strips onto the enlarged sketch to preview them, I had added colored pencil, so I could tell the sky from the leaves. When placing the leaves onto the background, I used a clear plastic sheet, with the enlarged sketch drawn on with Sharpie. See the shiny photograph.


I found a nice piece of black fabric with a charcoal gray print of cats, that was perfect for cutting the wing for contrast. The brown for the cattails was a pin dot, and a beige calico print. I use raw edge applique as my basic technique, and apply all the pieces in place with a glue stick. I use a toothpick to slip glue under all the edges, especially the points.


The free motion quilting/applique is all done with rayon thread, the shine of the thread makes it a design element, rather than just blending into the fabric and disappearing. I used about 8 shades of green, from pale green, yellow-green, teal, olive, grass green etc... The blackbird was very simply outlined, with a few stitches to give the wings feather lines. The background is quilted in a spiral/curly cue pattern, flowing across the fabric, I used white rayon in the lighter areas, making it appear as cloudy, and light blue in the remainder. I love the clean look of this quilt, and the texture on the sky, the blackbird is definitely the focal point.

Monday, July 16, 2012

Sunday, July 15, 2012

Redwing Blackbird

While taking my morning walk with my neighbor, along an abandoned railroad track, we were looking at wildflowers and cattails, and I was reminded of a walk with my sister, in which I took cattail pictures. Our walk in Monroe, Washington around Lake Tye, had bunches of cattails and red winged blackbirds. My photographs with the sun setting in the evening, created a color saturated blue sky, and rich intense colors on the cattails, and back lit the blackbird, making the red markings glow.

I had wanted to make a quilt with this simple design, and my memory was jogged. I went home and printed my favorite picture, and created a line drawing with a Sharpie fine point pen onto a plastic sheet protector. If you cut them apart, you get two pages, and they are a lot cheaper than the over head projector sheets. I put the line drawing into the computer scanner, to save it, then printed it out in "Poster format" onto 4 sheets of paper, to enlarge it. The size worked good, and I kept moving the bird to the right, creating more open sky, because I did not want the bird to be dead center in the composition.


Now for the fun part, fabric selection! Digging through my box of hand dyed fabric, I found a rich blue with some mottling, do to scrunching the fabric during the dye process. It is the perfect size, just a bit longer than a fat quarter. So now my creative juices are flowing again, and I can't wait to get started on it in the morning. So after the blahs, all it took to get me going, was taking my regular walk. May the Muse strike you as easily!

Friday, July 13, 2012

Gelatin Journal Pages

I decided to work on two of my gelatin printed fabrics, my favorite fern piece that I printed at the "Art in the Garden" and a double hand print from playing with masks.


I free motion machine quilted both fabrics, outlining the print/mask and adding details, like the life lines and fingernails on the hands. The fern background was done in small circles, around the sequin waste printing, and to fill in the background. The hands background was done in a horizontal back and forth, over Angelina fibers to add "reflection to the mirror." The ferns had 3-D details added to it, a thread painted dragonfly in the top right corner, and yoyo mushrooms at the bottom, with pipe cleaners in the stems. A small bright green rubber tree frog was sewn onto the tallest mushroom. A twisted fabric branch with hand dyed cheesecloth moss was set on the right edge, embroidered French knots added more texture to the moss. Moss was spread across the bottom also.

These small 8" x 10" journal pages are fun to do, they quilt and finish quickly, and make great gifts. I love to do them, instead of getting involved with a big project that can take me months to do. I have several large projects that I work on a bit at a time, and when they loose my interest or I have to think on them for a while, I can make a quick journal page.

Friday, July 6, 2012

The Creative Blahs

I've been in a blah mood, not working on much of anything. If I sew, I have been doing pieced blocks for baby quilts, and assembling them into tops. My deadlines are gone, and I need a kick in the butt. I tried to collage some journal pages with torn strips from magazine, and the process was fun, cool, warm and neutral color pallets. But then, what to do with them. I doodled leaves on the green one, and hated it, so I painted over a blend of olive green and white acrylic, some of the doodle showed through which is ok, but now, what is the next layer? So I moved on, I layered some Gelli prints with backing and batting, getting ready to free motion quilt, but they are not inspiring me either. I've been looking through art quilt blogs, trying to get inspired, especially thesketchbookchallenge.blogspot.com and andthenwesetitonfire.blogspot.com
two of my favorite blogs to read. I have lots of projects to work on, my UFOs (unfinished objects) are growing as we speak, but they are not yanking my chain either.


I tried going through some of my photos for inspiration, flipped through piles of fabric, tried to finish a little wall hanging, just blah...... Maybe if I get out my paints, we'll see what happens. I'll let you know how it comes along.