Sunday, September 29, 2013
When it All Comes Together
Over the years of my quilting adventure, I have been very technique oriented, always learning new things, trying new techniques and materials, buying books and magazines with technique themes. Trying the projects in the book or class, with their patterns but tweaking them a little, needing to be original. But it still felt like copying, even if it was just copying a style. I learned silk ribbon embroidery, embellishing with beads and charms, Kumiko Sudo's 3-D folded flowers, and other embellishing techniques. As my free motion machine quilting improved, I quilted everything with feathers, then became enamored with rayon thread. I started making landscape quilts with Susan Carlson's collage techniques, and hand painting sky and sea fabric. Joining Fyber Cafe, our textile art group, when it first started, gave me even more options. One of the books I read, asked, "What is your quilting style?" WOW, did I have one? This got me thinking a long time, I had jumped from one new thing to another, always starting a new project with each technique I learned. But this gave a very disjointed body of work. Did I have a style? It hit me one day that I did, all my quilts whatever the design had intense machine quilting with rayon threads. You could tell it was my quilt by the quilting, not the design or color or technique. The quilting was the unifying element. With Fyber Cafe, I learned fabric dyeing, printing, more surface design painting techniques, photo transfer, design and color concepts, fibers and needle felting, thread painting, on and on, always looking for the next NEW thing. But I was developing a style, original work was coming from me with a variety of techniques. It was all coming together! All the techniques I had learned were becoming useful as I participated in Fyber Cafe challenges. Our "Whats My Line?" challenge used needle felting, heavily hand beaded with buttons, beads and charms. The "Beatles Song" challenge held design principles and color theory. The next challenge "A River Runs Through It" brought me back to collaged landscape quilting, but it felt too much like the regular old me, except I had used hand dyed fabric for the background. So I pushed it a little, and used melted & painted Tyvek for the birch tree leaves, created a 3-D piece to add off the bottom edge, added silk ribbon embroidery and beading, all the techniques I had learned where coming together. It made the challenge art piece even better, than if I had left it as just another of my landscapes. I feel great about what I made for the "International Painters" challenge, being assigned Leonardo Da Vinci was intimidating! WOW, how do you compete with the Last Supper, the Mona Lisa and the statue of David. Researching him online I found lots of pictures of his sketchbooks, he drew everything from mechanical inventions, to human anatomy, painting studies of balance, figures, hand gestures, color trials, a vast variety of things. Today's art advocates are pushing art journals & sketchbooks, exploring your designs, techniques and talents. This made a strong connection to me, to see all his sketchbook drawings, quick doodles to see how the figures of the Last Supper interacted, facial expressions of the Madonna, and David's pose. We now know the Mona Lisa has many layers of paintings, as he tried again and again to get it right. Even Leo made mistakes, but he took the time to work them out with a sketchbook. So learn everything you can about your art, play, sketch, paint, draw, and let it all percolate in your brain. Our art group has trouble meeting deadlines, I think this is because we think about it so much, the ideas bounce around and mix in our brains until the ideas gel and we CREATE! When it all comes together in the perfect out pouring of our creativity, it is the best feeling in the world! So go out there and be original, let it all come together. P.S. I could have filled this post with photo examples of the quilts and techniques I was talking about, but I think it will be an adventure for you to search my blog and learn all the new techniques I talk about.
Saturday, September 28, 2013
Leonardo Continued


Friday, September 27, 2013
Stash Saturday
MY STASH IS HUGE!!! Not just fabric, but embellishments of every sort. I literally have shoe boxes, pizza boxes and open shelves stacked clear to the ceiling! I do NOT waste space in my sewing room. My fabric is sorted by colors and fabric types. I have my Bali batiks separate, also my nature realists fabrics, my undersea prints, and my "Objects" stash. The objects fabric stash is a collection of fabric that I use for fussy cutting. If I need a crocodile, I have fabric to cut that from, baseball, got it, pink flamingos, monopoly money, painted car flames, birds, butterflies, feathers, and snake skin prints. I even have some Elvis/blue suede shoe fabric. It is the real fun stack of fabrics. Sunflowers, cows, dice, fish, etc... Also I have boxes of beads, buttons, trim, silk flowers, rhinestones, needle felting fibers, wire, ribbon roses. It is all labeled, but not always handy to get at. 
 I have a selection of vintage buttons, not as many as a serious collector, but LOTS of buttons to go through. The first pic is some brass buttons, I found in my Mom's button jar. She does not have just a mason jar, she has a five gallon glass pig!! She filled it up on trips to the flea market in California, 30 years ago. When my Mom was moving to Seattle, a friend who is in the button society, came to visit, we dumped all Mom's buttons onto cookie trays on the dinning room table, and went through them one by one. Suzie did not believe me when I told her how many there were. We each got a huge pile of buttons, Suzie got some very special ones that she bought from Mom, I got lots of fun stuff, as I am not a collector, just an embellisher. We had a ton of fun, and Mom reminisced about some of her or Gramma's dresses that some of the buttons came from. The vintage Rhinestone buttons came from the PIG and my sister's finds on E-bay. She had wanted me to decorate a jean jacket with them for her. I finally used some on her jacket and got it back to her. I also have a separate stash of Mother of Pearl buttons. Some donated to me, there are some newer plastic ones, but most are made from real shell. I have decorated Christmas ornaments with them in the past. Using a glue gun, I put MOP buttons all over a silver or white ornament, and a big button on top, put the hanging wire back in, and add a wire ribbon bow at the top. They make great presents to your sewing buddies. I have the MOP buttons in a replica Singer tin, with 3 drawers and little brass window frames for the name tags on each drawer.
 Well I hope you enjoyed the visit with some of my buttons. Check back next week to see what else is in my stash.


Foto Friday & Stash Saturday
I'm going to add a new feature to the blog, on Fridays I am going to post a few inspirational pictures for you, and on Saturday I'll post some pictures of the various treasures in my stash. Maybe not every Friday or Saturday, but I'll try. 
 Ever since I got my new camera a while ago, my goal has been to make art quilts based on some of my photos, I have a vast variety of photos and I hope they can inspire you to create beautiful pieces of art. I am going to start with some flower pics, that I have cropped into very tight closeups. I can use the macro and super-macro on my camera, but a lot of times it is just easier to crop a regular picture. You get more depth of focus on a regular picture, closeups are difficult to get focused well.
 I think the azalea would be difficult to do as there is not enough contrast between light and dark on the PINK petals, but the bee detail is great. I also love the negative space between the bottom clematis petals.
 The long reaching petals of the bee balm are really individual flowers, each with their own sepal, and the cluster in the center of hellebore is detailed and intricate. My choice would be to use the clematis for the basis of a art quilt pattern, the flower petal shapes are distinct, and the individual sepals are intricate. As I look at fall fast approaching, I can look back and be inspired by the bright colors of summer, and a floral quilt would give me much joy to work on during the dreary rainy Oregon Autumn. I hope these can inspire you as well.


Thursday, September 19, 2013
Da Vinci Challenge Begun
This years International Quilt Challenge, that I belong to, has chosen International Painters as their theme. I was assigned Leonardo Da Vinci, as my artist to interpret into an art quilt. An artist from France and one from Japan will each also do Da Vinci. There are 30 artists each from the US, France and Japan, there will be an artist from each country do each painter, so there will be 3 different interpretations. The first show they will be in, is Quilt Week Yokohama, then the even BIGGER International show in Tokyo. From there they will go to France, then the USA for several years. I have participated twice before, in "Currency Exchange" and "International Festivals", both toured Japan, the USA, and one show went to New Zealand, the other to France. I'd like to thank the curators for giving me this chance to participate. 
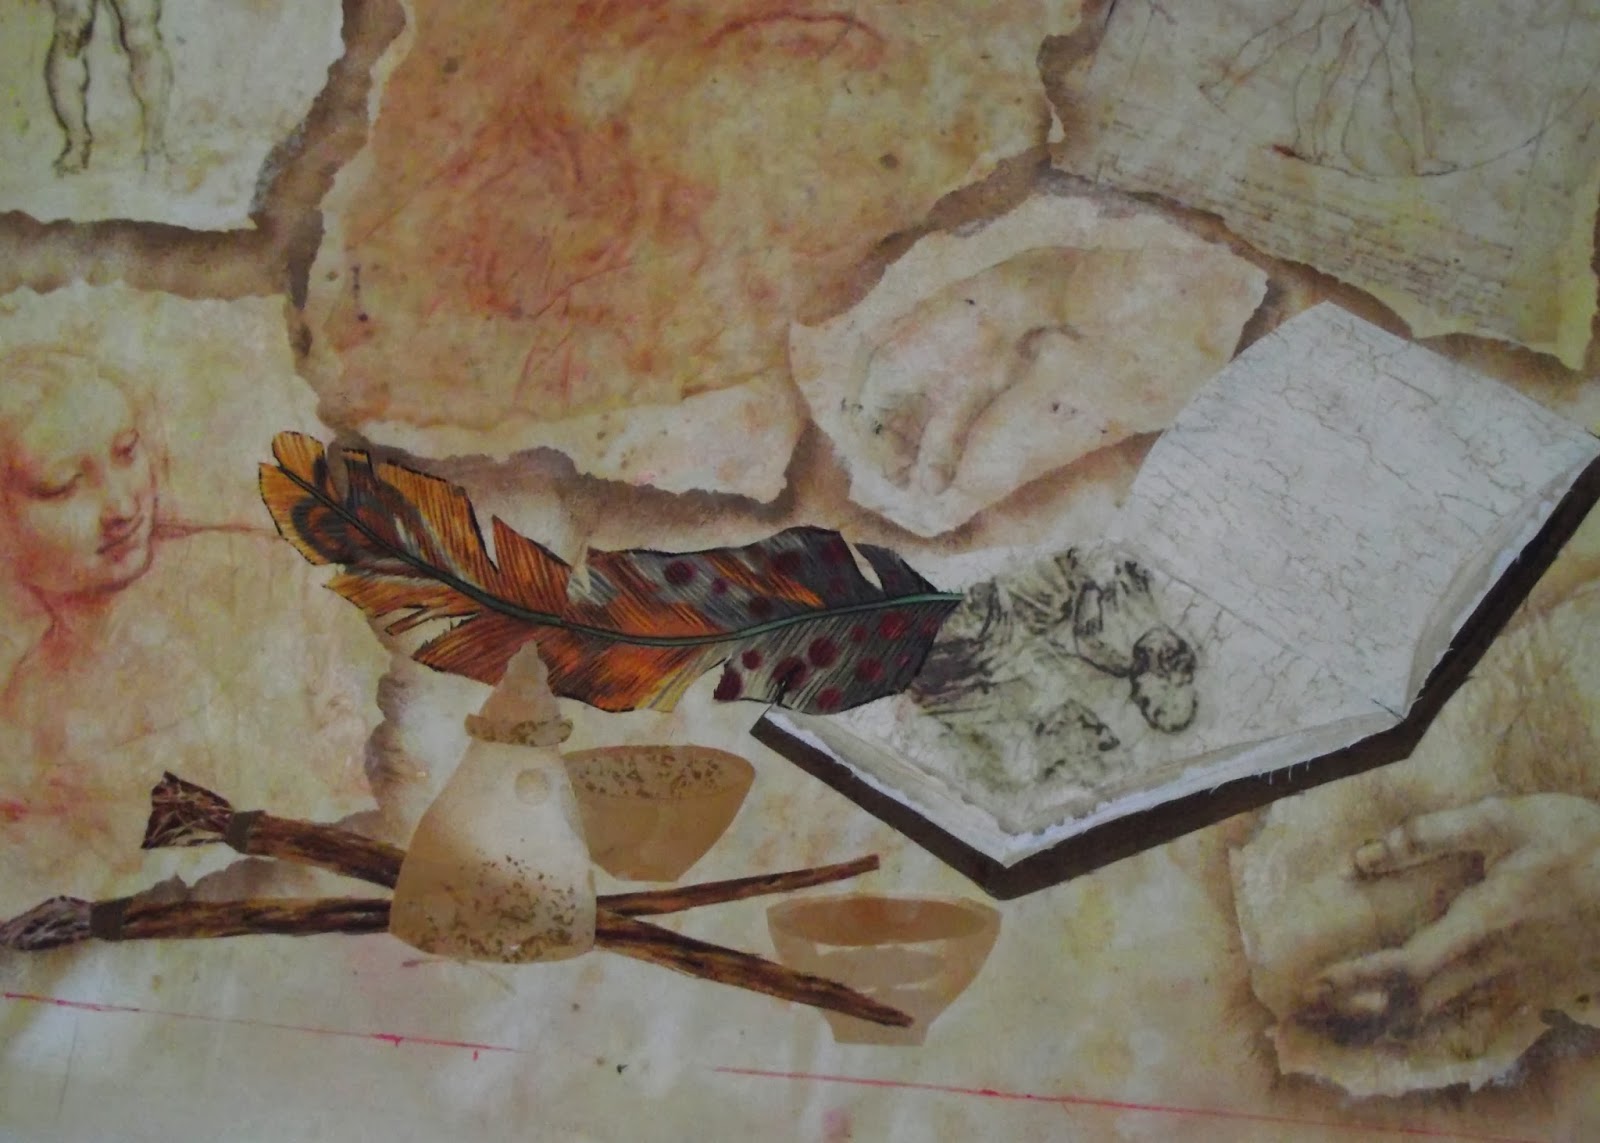
 I began by selecting several images from his sketches, of a pair of hands, the statue of David, a Madonna, Vitruvian Man and sketches from the Last Supper, also his self portrait, which would be the main image in my composition. I arranged them onto a hand painted piece of muslin, that I did in acrylic paint, with splatters, and salt, in a light terra cotta color wash. Seeing them laid out, my brain storm was to shadow paint the torn images, creating a raised relief effect. I used two shades of reddish brown, and dry brushed around each piece of paper, leaving a crisp edge and a shading shadow. See first two photos.
 Next photos, as I began to paint around the bottom two pictures, and the paper templates, completely painted around. It gave the contrast in color that I needed to highlight the pictures, so it wasn't too blah.
  You can see the softly mottled background fabric, and the crisp shaded outline of each paper template.
 The next part of the project was to print my images onto tissue paper for image transfer to the fabric. I used plain white tissue paper for stuffing gift bags, I ironed it on low, and taped it to a piece of paper from the computer printer. I used Adobe Photoshop to crop the images, and give them a little more contrast. Then I ran each sheet individually through the printer, they went pretty well with just a little extra ink at the top edge. I tore each image to fit into the painted template area, and spread mat medium with an index card, in a thin layer onto the fabric, placed the image and burnished it down with the edge of a clean piece of card. Then added more drops of mat medium, and spread it evenly over the image, being gentle not to tear the paper or smear too much ink. Some of the reddishness of the ink bled off, but did not disfigure the image. Some small wrinkles developed, but I left most of that in to give it an "Old" texture.
  The images transfered beautifully, it looks like burnished leather on an old stucco wall. They have a slight satin finish, but it is smooth and flexible, and should be easy to stitch through. The game plan is to finish applying all the images, and then applique a sketchbook, ink jar, and feather pen on the bottom blank area. I will then thread paint/quilt, over the lines of the images, especially the self portrait, to try to highlight his lines and the sketchy quality of his work. I am very happy with my progress, it is coming out even better than I had hoped. I have never had a piece where the quilting did not add a wonderful quality to the finished piece, but I am worried about this one. I don't want to ruin the lines of his drawings, and I'm not sure how the texture will change the look of it. We can only wait and see. Stay tuned.


Saturday, September 14, 2013
Postcard Exchange - Laugh

Boxed

Expressive Words on Gelli


Monday, September 2, 2013
Foam Words
I had a lot of fun making foam words to use in printing, rubbings and Gelli prints. I got the idea from the "Gelli Arts" page, and just couldn't stop making more words! Click on the "Gelli Arts" badge in the right hand column to go to their website.  I have always wanted to add words to my art quilting, and I have bought many types of alphabet rubber stamps, metal letter cookie cutters, foam letters and stencils, anything to make words with. But faced with a set of alphabets, it was always a matter of what do I want to say, I couldn't think of anything that did not sound insipid. Somehow, faced with a set of WORDS, I was able to come up with some combinations of ideas. It is like the sets of refrigerator magnets, that you can arrange to make poems or phrases. Words inspired me, the way alphabets did not.
  I found sets of alphabets in several different fonts, try the dollar store, Michael's or other crafts supply place. You want a raised letter, not a sticker. Line the letters up straight or wonky, try mixing the different fonts. Look through magazines for inspiration on words you want to use.
 Combining words gave me the freedom to express myself better. I started with, play, sing, soar, fly and laugh. Adding adverbs and adjectives helped make them come alive. Trust Love, Risk Truth, Play Hard, Fly High, Laugh Always, Sing Loud, now I was really expressing myself! I just can't stop! I bought more "stick on" foam alphabets, sheets of foam for backing and made more words. I glued a double layer of the foam sheets together as a base, and stuck the letters on them. They are ONLY good for rubbings and Gelli prints, as the words will come out reversed if you print with them. For printing the solution is to get foam alphabets that are NOT "stick on" you can glue them to the base upside down and backwards, so they will print right side up. When I made these kind of stamps, I put it right side up on the front, and backwards on the reverse side, so I had a double sided stamp, for multiple uses.
 As you run out of vowels, you will make funny things and stupid words you will never use. Try using the leftovers for borders <><><><><><> WMWMWMWM *****, make a set of swear words #^&*@#! Use the inside little bits and pieces to make texture patterns. I made polka dot textures with the centers of the B's, P's and d's. I even found a set of curly cues.
  Now I am going to get out my paints and Gelli plate and start making expressive fabric that speaks to me.


Subscribe to:
Posts (Atom)