Tuesday, March 19, 2019

Gel Print Class

On Thursday I taught a Gelatin Monoprinting class, for several ladies from my Fyber Café art group. I hauled in a whole lot of supplies, stencils, masks, found objects, feathers, twine, potato mashers, combs, as well as paint, fabric and paper. Most of us wanted to print on fabric, but we did do some paper too. Fabric takes a little bit thicker application of paint, to adjust for the weave showing through. We played and played all day. Spring was three weeks late for us, as we had a late snowfall at the end of February, so there was very little greenery to pick. Ferns and heavenly bamboo are green all year around here, I had put some ginkgo leaves in the freezer last fall and they worked great. A friend gave me a hand full of peacock feathers, what fun! One lady got fixated on a spirograph type stencil, another with the turkey feathers. Each had a favorite style, and I encouraged them to make coordinating prints, in different colorways, so they can collage an art quilt from them. The photos are a few from each lady, but I am sure I've got the identities mixed up on some prints. Crystal had a variety of stencils, and the last print is on an "ugly" hand dyed fabric. Lorraine loved the feathers, and she made a few prints with an opaque yellow on black. Meredith used a lot of botanicals, a tangle of eyelash yarn, and stencils. Stephanie's spirographs in many bright colors, she made many more. Tracy used feathers and a favorite stencil. The last print is the stencil and it's ghost print on the same page, isn't it fabulous! I made some prints to use as the demonstration, but I did not get any pics, I'm sure some of them will show up in a future project. I will be linking this to Nina Marie's "Off the Wall Friday" click here to see what other fantastic textile artists are doing this week.

Friday, February 22, 2019

More Gel Prints

I have been playing with my Gelatin Plate, making lots and lots of prints. I'm going to be teaching a class soon, so I thought some practice was in order. I also wanted to check out different paints, and the difference of printing on fabric and paper. The fabric takes a thicker application of paints, and a heavy body acrylic or tube paints works best. The paper works with ANY paints, and a thinner layer can be applied. Paying attention to the opacity and translucent qualities of the paint was important. You can't put light colors onto darker with out the opacity, but the translucency made the colors glow and many of the layers show better.
I worked mostly with stencils this round, trying many that I have collected. I am a stencil ADDICT! That is the main reason I bought the Brother Scan N Cut, to cut my own stencils. With all the many prints the next step is to make something from them. ???? What to do? I pulled a selection of like colored prints, mostly blues and greens with a bit of complimentary red, added some botanical prints from another session, and collaged them together. I really like the color combo, and the leafy designs gave it a cohesiveness, but I think it lacks focus. But I am going to use it as a sampler for my class. I think it would be a nice table topper with a center piece in the middle.
The sprouting bulb images are from a rubber stamp I carved, actually four, each stage of the sprouting. The leafy green at the top right is thermos-fax screened, from a screen I got from Judy Coates Perez at Craft Napa last year.
I really enjoy the quilting on the gelatin prints. Using rayon threads gives it some shine, as the paint is quiet matt. I outline all the printing which gives it lots of texture, especially the hexagons. With lots of thread color changes, it brings out the details. I haven't come up with a name for this one, besides gelatin sampler, any better ideas?
I began to assemble a second piece, more of the earth tone colors, yellow, orange, rust and red, with blue/green accents. The blue green took over more than I had intended, but it still reads warmer than the first piece.
A few close up pictures of some of the printing details. I think I will call this one "Tire Tracks" or just "Treads." I am linking this to Nina-Marie's "Off the Wall Friday" click here check it out to see what other talented artists are doing this week.

Friday, January 18, 2019

Gelatin Printed Triangles

I taught a short class last week to Fyber Café on gelatin mono printing. We had so much fun, that I scheduled a full day class for early March at Create and Sip. I've been watching You Tube and getting even more ideas. When I got home I sorted through my gelatin printed fabric to see what needed second layers of paint. I found a whole pile of triangle scraps from the prayer flags I made my sister last year. So I began sewing them together in pairs and cut long 3 x 8" triangles from them. Laying them out I decided to add some half square triangles for more angles and interest.
It finished up as a nice size. You can see the wonderful textures and colors of all the variety of fabrics. It was very random, but I did put the orange triangles together, to add a focal point.
A closer view shows the prints. I am happy with it, don't know what I'll do with it though, or what I'll name it. I seldom make anything abstract, or geometric, I am very pictorially focused. So this was quiet a deviation for me.
I also found a small 8" x 10" gelatin print, that was already quilted and bound, and had a bag of vintage buttons with it. I spent a few days adding the buttons, and really like it. I've titled it "My Mother's Buttons" because they came from my Mom's stash. I am linking this with Nina Marie's "Off the Wall Friday" click here to see what other textile artists are doing this week.

Wednesday, January 9, 2019

Claudia Law Class

After the retreat in Bandon, and the retreat at the Big K Ranch, my art quilting friend and I went back to the Big K for an art class with Claudia Law from Ashland, Oregon. We had signed up for it months ago, and it just so happened it was the next week after I had just been there. So I had 3 big events in one month, whew! This time Lorraine and I stayed in one of the cabins, and we could quilt as long as we wanted to in the evening. This made for some long days, 12 hours of sewing at the least. After dark, there wasn't much else to do, as we were miles from anywhere. We had each selected one of 5 art quilts that Claudia had made, I choose "After the Fall." It was of an autumn branch with leaves, hanging over water, with ripples. It had a glow to it, that I loved, and I hoped she could show me how to achieve that effect. But it was in RED, and that would not have gone with anything in my house, so I asked if I could do it in cool colors. I had some preconceived ideas of what I wanted to do before I went. I'm not sure this was a good idea, would I follow my plan or let her influence me enough to learn from her. My first objective was to use some blue/green shibori hand dyed fabric that I had just made, and only use my hand dyes for the rest of the quilt. In the photo you can see my fabrics, set up as a sky/water background. She taught us how to cut and sew gently curves. I auditioned many, many moon/sun fabrics, taking photos so I could really see what they looked like on my camera. This was inspired by Claudia teaching us how to machine sew circles into our work. Not part of the original plan. I already knew how, from directions LeAnne Paylor had posted on "Off the Wall Friday" last year. In a fit of boredom, waiting for others to catch up, I decided my background was too plain. Everyone else had complicated pieced backgrounds, taking most of the day to create, so I decided to add the pieced squares of my shibori fabrics on the left side.
Claudia taught us how to piece in branches, into our backgrounds, see quilt below, but I added raw edge applique as I wanted my branches gnarly. The problem was I had NO brown hand dyed. I had made gorgeous brown fabric, but it was still in my drier at home, great place for it to be. I finally settled on a maroon, but I am going to cover some of it up later, as I am not fond of it. I spent the evening making 3-d leaves for my branch, double layered with fusible, and machine stitched veins. Lots of rearranging to get a good flow, and a few more leaves too. After spending the next morning free motion quilting the background, I added the leaves, then I stitched them so they twisted and curled around on the background.
One of the things Claudia specializes in is hand painting her fabrics, to fit her ideas and add texture and highlights. After the quilting I added paint to the moon. The quilting texture on the moon created a wonderful texture to sponge gold metallic paint over. I'm going to add metallic paint to the edges of the twisting leaves to highlight them too. Claudia taught us how to paint on fabric to make 3-D butterflies (see quilt below) but I decided I wanted dragonflies on mine, so I'll make them later.
Many of her students were doing landscapes of one sort or another, and she showed them how to paint some rocks for a river scene. They looked wonderful, very realistic. So in a brainstorm I decided to add a pile of balanced rocks at the bottom of mine. I was looking forward to doing the circle of ripples in the water, where the leaves touched it, but this was a much better idea. I had already free motion quilted the ripples, but the rocks would cover that. I would have been very happy to just use my gray mottled hand dyes for the rocks, they looked good. But boy am I glad I added the paint!! What a difference it makes. Highlights and shadows, added shape and texture and depth! Whoopee! Just as we were finishing up, I got the rocks added, with an extra layer of batting for a trapunto 3-D look. I have more to do, a tulle shadow below the rocks, lots of dragonflies, highlighting the leaves and moon reflection with paint, and the binding. I am going to use this quilt for our art group challenge. We had been issued 5 playing cards with different techniques written on them, and we have to use 3 of those for our challenge piece. I needed to do hand dyeing, raw edge applique and add metal objects. So I am going to sew some Chinese round coins in some of the edge squares, and call this piece "Serenity Pond." It looks NOTHING like I had envisioned before I went. I would not have added the moon, rocks, painting, willow leaves, if not for Claudia's influence. The quilt took on a life of it's own, as it evolved into being. I don't think the curved piecing on the background made any difference, it is covered by leaves, and is now kind of distracting. But other than that I am really happy with it. I can't wait to finish it!
While waiting for everyone to piece their complicated backgrounds, I decided to cut and sew a pieced background of my own, to do a second art piece. I used all my own hand dyed fabrics, and I think they look great together, adding any commercial fabric would have given it a whole different look. Everyone else was going horizontal with their strip sets, but I decided to go vertical instead. Each set was put together with a curved sewing line. Some people made several strip sets and curved cuts to make a very complex background, that took a long time for them to sew.
Claudia also taught us to inset curved strips into our backgrounds, the strips were also varying widths. I had sewn narrow strips into backgrounds before, but not the curves or width variations. This offset the strata we had pieced together, which was impossible to realign, don't even bother trying. 5 of the inset main lines are pieced, the other smaller lines are raw edge applique. We gave up on the cut and piece for more than a few lines. We also played with paints, watercolor pencils, oil pastels and other art products to make flowers and butterflies. Claudia had a quilt of beautiful blue butterflies, that we all admired very much.
I made five butterflies, with double layers of fused fabric, layers of acrylic paint, front and back, and jacquard luminescent paints as the top layer. They became very stiff and sturdy, adding detail really helped. I used a fan brush to add a feathered edge and painted dots to add detail. I was happy with them at the end, but they went through various stages of hatred first. The dogwood flowers in lavender and pink were done with watercolor pencils, blending the lines and shading with a watered paint brush. Pearl pink lines were painted in also. The centers are a small wad of Angelina fibers in a green/copper color. The flowers and butterflies are all 3-D, so they wings and petals stand out from the quilt. This piece is finished with a turned facing, a straight edged top and wonky side and bottom shapes. It was completely unplanned, I just went with the flow. We had four wonderful days at the ranch, being creative and having fun. Most of the work by others was wonderful, but a few beginners got discouraged and did not finish their projects, but they learned lots of new techniques. Several of the beginners did very well. Everyone was excited to do it again next year. I am linking this to Nina Marie's "Off the Wall Friday" click here so you can see what other talented textile artists are doing this week. Please leave a comment, they mean a lot to me. Thanks.

Saturday, December 29, 2018

The Pattern That Wasn't

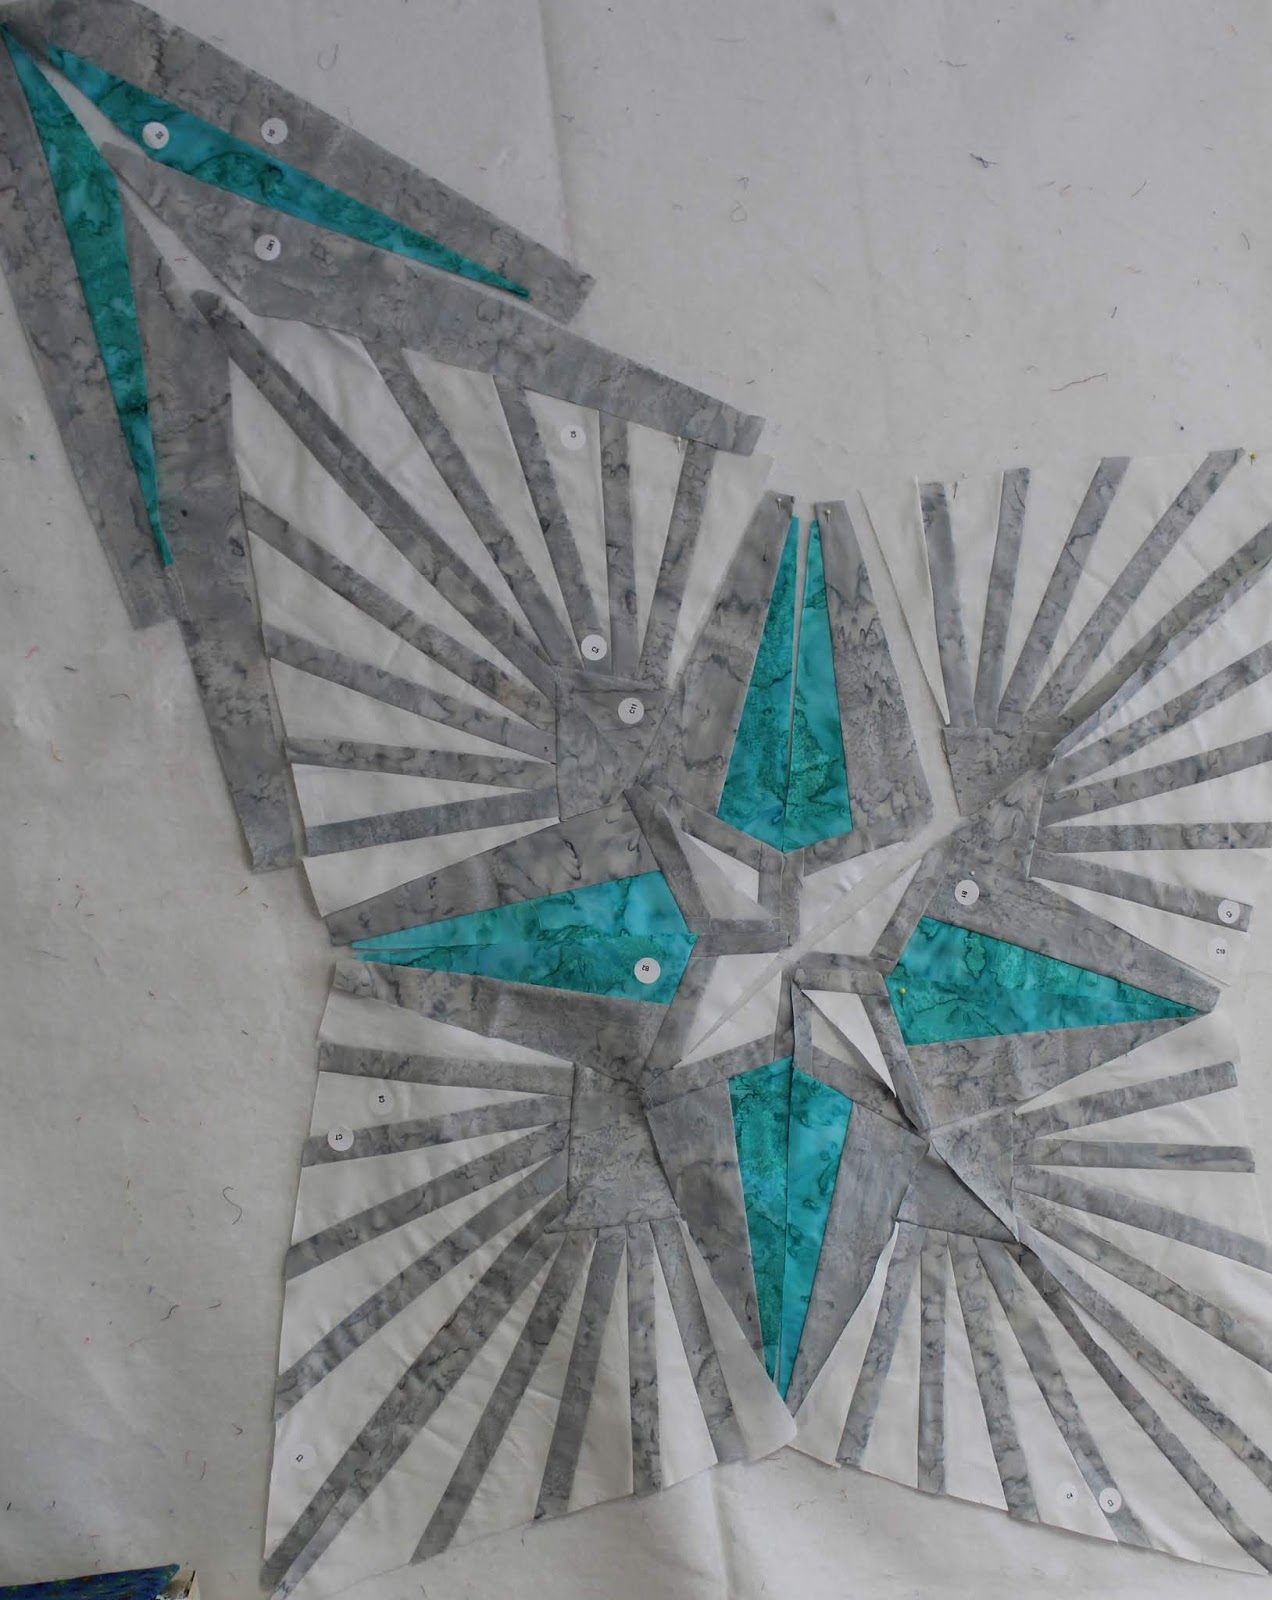
On my first retreat in Bandon, I took with me a Kaufman kit called "Crystal Clear" It is queen size and I knew it would take up a good part of the retreat days to work on. With the sharp pointed star pattern I thought it would be paper piecing, but much to my surprise, it was not. I opened the box and it was all pre-cut pieces with little numbered stickers on each stack. Oh, WOW! As I looked through the box, there was no pattern, no photo, no diagram, no nothing. I only had the photo on the cover of the box. I was quiet upset as this was almost the only thing I had brought with me to work on, and I was a long way from the shop I had purchased it from. But not wanting to be a quitter, I thought I'd give it a try, to figure out how it went together. I organized the stacks of pieces, fortunately only three colors. They each had a cut notch on them to line up the sewing, I put all the "A" pieces together in numerical order, unfortunately the fabrics are batiks and reversible, sometimes the stickers were on the front, sometimes the backs. It took perseverance, but I got one section sewn together. I worked diligently for three days, slowly making progress and not doing too much unsewing. It was tough working out, where the sections were, without a diagram, and some trial and error, finally got me to assembly.
I was lucky to have a large design wall to work on at the retreat center, it would not have been as easy to assemble at home. There were a few poufy areas that had to be fudged in, but I decided it was sewn together properly, with all the correct angles.
Success!! I got it put together into a queen sized quilt! Since then I have found more of the gray fabric to add a wider border, to make it a bit larger. It is going to be for my niece who wanted a "Modern" quilt with grays and blacks, maybe chevrons. When I saw the kit, I knew it would be perfect for her. I never buy kits, it was quiet expensive, but I thought of her immediately. Since I was thinking of nieces, I thought my other niece would like this modern look also, instead of the quilt I was working on for her. So being the masochist I am, I decided to do it again! I had the fore thought to trace each of the pattern pieces, so I cut them up and with LOTS of Scotch tape, I taped each section together and made a paper piecing pattern. Shopping for fabric was tough as I had no fabric requirements to use. I found a beautiful black with a delicate leafy pattern and a gray batik with swirls. I bought all the fabric on the bolt, 4 or 5 yards of each. I figured 9 yards was enough to do a queen size quilt, then I would pray. I added a bright magenta to accent it.
The last day of the retreat I got a good start on it. The next week, everyone at the Bandon shop was going to the Big K Guest Ranch, near me, for their retreat, so Tracy and I signed up for that too. I worked on it for another day and a half, before running out of the black fabric. I was praying I could find some on the internet, it was a new fabric.
Driving home from the retreat, we stopped at the fabric shop in Sutherlin, Oregon, and they had the fabric, I bought the rest of the bolt! YEA!! So now, I don't need to worry about it, I had already found more of the gray batik, so I can add extra border. This was quiet an ordeal, but I stuck with it. Now to get them on the long arm and really finish them. Happy New Year to all! I am linking this to Nina-Marie's "Off the Wall Friday" click here to check out what other talented textile artists are doing this week.

Friday, November 9, 2018

Retreat, Retreat and Retreat

I have been busy, busy, busy, one quilting retreat after another. Our Fyber Café group took their annual retreat to the Oregon coast. We stay at the retreat center above Forget Me Knots quilt shop for 4 days in Bandon, Oregon. Lots of fun, good friends, good food, and walks on the beach. I got a lots of sewing done. In an effort to finish things, I put together the blocks of a hand applique Hawaiian quilt that I made years ago. I was going to quilt it a block at a time, but decided now that I have a long arm, just to go ahead and assemble it. At one time I had lost a block, argggh!! It took me years to find it, accidentally pulling out some paper pads from a rack, the block had gotten wedged into the back of the slot, weird, how it ever got back there. Thankfully I found it and finished up all the hand stitching. It is rather pastel colors on purpose, it was going to be mostly pink and purple. I had a purple batik fabric for the border but it was too gray and dulled it down a lot. So the teal sashing and border helped perk it up a bit. I am happy to have one more project done, now it is in a pile to long arm quilt, instead of a shoe box of unfinished projects. And bonus, I get an empty shoe box to fill with another project!
At the first retreat I got the pieces sewn for baby Emelia's baby quilt, my nephew's new baby. I used 1920-30's conversation prints, in a simple rail fence pattern. I had a beautiful soft print of vintage children and ladies with parasols in a garden that I used for the border. At the 2nd retreat I got it mostly quilted, but the muslin I bought for the backing had shrunk too much in the prewashing, so I needed to get home and buy more fabric and piece it onto the backing. I have that done now, and it is just waiting for the binding. The little girl is almost a year old now, but it is toddler size, a bit bigger than a baby quilt.
I also got the top done of inset circles for my second marble quilt. The first one was called "Marble Madness," made with my hand dyed fabrics. The second is "Marble Mania" made with hand dyed fabrics from a resist dyeing class. The prints are made with different resists, soy wax, potato dextrin, corn syrup, water soluble gutta and school glue. I had cut out the fabrics a while ago, another unfinished project (see a theme?) and got them all sewn into the backing. At the second retreat I managed to get it all quilted with lots of detail and rayon threads. After I got back from the first retreat at Forget Me Knots, they were having their retreat the next week at the Big K Guest Ranch, near where we live, so one of the ladies and I signed up for that too. Five more days quilting and sewing at the lodge, very intense, 12 hour days at the sewing machine. They had a retriever dog trials at the ranch, so we were able to watch them from the sewing room balcony as they played in the pond and fetched ducks. It was the last of the beautiful warm weather, we even sat out in the sun and did some hand stitching. I did not stay at the ranch cabins, as my friend only lived about 5 miles away, so we stayed at her place. After 5 days home, I went back to the Big K ranch for a 4 day art quilting class with Claudia Law from Ashland, Oregon. I did stay in the cabins that time. More about the class on the next post. I am linking this to Nina-Marie's "Off the Wall Friday" click here to check out what other talented art quilters are doing this week.

Saturday, September 29, 2018

Dyeing Play Day

Our Fyber Café group had another fabric dyeing play day at Meredith's in Grants Pass last week. We had great weather and smoke free skies. I did some more shibori and helped others learn how. The first piece is done with Procion MX Terra Cotta dye, the 2nd is Bronze. we love the bronze, it mixes well with other colors and sometimes the colors separate so we really did not know what color it really was. This is the first piece I have only used Bronze.
These three pieces were done with turquoise, electric blue and indigo. The photo really doesn't do the colors justice.
Bronze and electric blue, I really like this piece.
I did 3 pieces by accordion folding them, then ice dyeing them with combos of terra cotta, fire engine red, rose brown, and fuchsia. They are folded in half so you see only a part of the fabric.
As soon as I got home from that I packed for a 3 day camping trip to the Oregon coast. It was so beautiful
It was glorious weather, great tide pools, campfire and friends. I am linking this with Nina-Marie's "Off the Wall Friday" click here to see what other talented textile artists are doing.